Sunday, November 28, 2010

Trader Joe's Holiday YUMMIES for my VERY 1st GIVEAWAY!!!


There are three types of "Joe" people... 
1 - Those who know Joe....and visit Joe often....and LOVE Joe.
2 - Those who don't know Joe, who may or may not have heard of him. 
3 - Those who knew Joe at some point in their life, but moved to a "Joe-less" place, but are more than happy to hook up whenever they go back to the old stomping ground.

Luckily for you, THIS giveaway is for all three types of Joe's people.  I, for the record, was group 1, then group 3, and happily again group 1.  I simply LOVE Trader Joe's!  I love to try out all the luscious, yummy things they get in seasonally.  I love even more calling my Mom (who only knows Joe through me) and taunting explaining to her what amazing new product I just tried. 
So, there was never any doubt that for my 1st GIVEAWAY, I would share some of my favorite Joe items with YOU!  Take a closer look at what one lucky winner will receive....
Really Big Gingerbread Man Kit
Fleur de Sel Caramel Sauce.  Also known as HEAVEN on a spoon!  PERFECT for a million things...in fact I add a spoonful of it, along with a pinch of salt to some hot chocolate for a knock off version of a certain Sea Salt Caramel Hot Chocolate at the place that rhymes with Shmarbucks.
Wine Crackers.  These perfect, slightly vanilla-y crackers ARE delightful with wine OR coffee.
Mulling Spice.  Two words....Mulled Wine.  It is also perfectly lovely for Mulled Cider for the non-wine crowd.
Salted Caramel Butter Cookies with chocolate....'nuff said.
Speaking of chocolate...Dark Chocolate After Dinner Mints.
All lovingly packaged in this super-cute, eco-friendly re-useable grocery bag. 
How do you win these spectacular bag-o-yummies you ask?  Let me tell you....on Monday, December 6th, I will use the Random Number Generator to pick a number from the comments in this post.  Cut-off for entries will be Sunday, December 5th at midnight, East Coast time.  Since my I like to up the odds for you, there are several ways you can get entries:
  • Leave a comment letting me know which one of these treats will be the first visitor to your mouth.
  • Become a FOLLOWER of Siggy Spice.  Simply hit the "follow" button to the right and then come back and leave ANOTHER comment letting me know that you are a new OR existing follower.
  • "LIKE" Siggy Spice on Face Book.  Follow the link on this page to go to the Siggy Spice Face Book page, and click "like".  Then, come back here and leave ANOTHER comment to let me know that you are a new OR existing fan on Face Book.
  • Link to this giveaway on your Face Book, Twitter, or Blog (or all three) and come back and leave ANOTHER comment letting me know you did so.  If you do all 3, leave 3 comments for each way you re-posted this.
  • Annnddd, I might (wink, wink) slip another (or two) way to get entries on the Face Book page and in my upcoming posts this week.
Just to be clear, if you want to lick the Caramel Sauce off a spoon immediately, become (or are) a follower on Siggy Spice, become (or are) a fan on the Siggy Spice Face Book page, and link this giveaway on your Face Book page, then you need to give me 4 separate comments on this post to let me know each way you got an entry.  The Random Number Generator will only see number of comments.

Just as a small side note, this giveaway is only available for those that live in the US. 
AND
Trader Joe's did not provide any of the merchandise for this give away, nor did they sponsor it in any way.  All they know me as is the crazy lady who is constantly chasing after 3 kiddos who are hitting people with the mini shopping carts while looking for the SQUIRREL!

Again, thank you, thank you, THANK YOU for your support over the last hundred posts!

MUCH love to you all - xoxo

Ready....set....GO!!!

This post has been linked at:
Mommy's Kitchen
Nikki's Nifty Knacks
Tidy Mom
Simply Sweet Home
Frou Frou Decor

Tuesday, November 23, 2010

Thanksgiving 2010 Traditions and Tablescapes

In case you were counting (ha ha ha), this is my 100th post!!!  WAHOOEEE!!!  I just wanted to shout a huge THANK YOU to all of you who have stuck with me!!!  Stay tuned, my very 1st giveaway is coming up in my 101st post, right after Thanksgiving.


In case your eyes are still burning from the last two VERY long posts, I have some good news...there is only two for this edition.  The first, is a Thanksgiving tradition from me.  The second, Wendy shares with us some uber-cute table place markers.

Ok, so here is my tradition I wanted to share with you:
photo courtesy of ProFlowers

Many people take the time on Thanksgiving to publicly give thanks for all the blessings they have in their lives. No matter where you are, or what circumstance you find yourself in, you always have something to be grateful for. I am a big believer in gratitude. Forgive the cliché, but I believe when you have the "attitude of gratitude" you open yourself up to even more things to be grateful for. So, when we are all gathered for Thanksgiving, this is how my family expresses our gratitude to those who have joined us. It is kind of a grown up version of the "car-wash" game we played in grade school. You know, the one where you go around the circle and the entire class says something they like about you.

We purchase a vase for each family unit or person that is joining us for Thanksgiving Dinner. We also purchase 3 bamboo stalks for each vase. A large bowl in the middle of the table is filled with enough river rocks for the total amount of vases. Taking turns, with each family or person having a vase with their bamboo in it in front of them, we take a stone from the bowl and say the things we are grateful for and what we love about each person at the table then drop that stone into their vase. We then take turns holding the stones and make wishes for them. The goal is for each stone, you say things you are grateful for, what you love about, and the wishes you have for them. Once you are done, you have a beautiful living piece that is infused with great energy. A great big bowl of love...who wouldn't love that?!

We wait to do it until after dinner so everyone is relaxed and not busy with last minute prep work.

This is such a powerful piece to share with those you love. There are always many hugs and tears of love to go around.  

I think this year, since it is just us, we may do a beta fish bowl for each of us, and let everyone pick out a different color of stone. The kiddos will be able to look at their bowl and have a visual reminder of all of the wonderful things they are and all that is wished for them, from not only Mom and Dad, but their siblings as well.

     *********     *********     **********
 
Wendy made these SUPER, SUPER cute table place markers:
"I used pictures of all of the attendees for the heads, then I copied and pasted some Pilgrim outfits from the Internet and spliced them together!!!"

photos courtesy of Wendy
    
      **********      **********     ***********

So, what are your traditions?  Any cute ideas for the kiddos?  Tablescapes?   Share, share, share with us in the comments section!

Sunday, November 21, 2010

Thanksgiving Dessert Extravaganza!

Ok, so I am a slacker!  I promised this post on Saturday, but I totally blew it off to go on a date night with my hubby who had been out of town for 2 weeks....and earlier today, we took the kiddos swimming and basically played all day.  But, here I am...all yours with some FABULOUS desserts in tow.
Now, I am breaking food-blog-law by not posting MY pictures of the recipes I am going to share.  See, these are the two desserts I always make on Thanksgiving, and I tend to throw in others that rotate depending how many people we are serving.  I did not want to make them early, and I didn't want to make them twice.  But I promise, I WILL take a picture so that I can put it on for next year :)
So, first up...again by me!


photo courtesy of Food Network

Pumpkin Gooey Butter Cake - recipe slightly adapted by Paula Deen.  This has forever replaced pumpkin pie in our house.

Cake:
  • 1 (18 1/4-ounce) package yellow cake mix (or spice cake mix)
  • 1 egg
  • 8 tablespoons butter, melted
Filling:
  • 1 (8-ounce) package cream cheese, softened
  • 1 (15-ounce) can pumpkin puree
  • 3 eggs
  • 1 teaspoon vanilla
  • 8 tablespoons butter, melted
  • 1 (16-ounce) box powdered sugar
  • 2 TBSP (more to taste) pumpkin pie spice
Preheat oven to 350 degrees F.
Combine the cake mix, egg, and butter and mix well with an electric mixer. Pat the mixture into the bottom of a lightly greased 13”x 9” baking pan.
To make the filling: In a large bowl, beat the cream cheese and pumpkin until smooth. Add the eggs, vanilla, and butter, and beat together. Next, add the powdered sugar and pumpkin pie spice. Spread filling over cake batter and bake for 50 minutes. Center will be gooey. Let cool to room temperature before serving. Great with fresh whipped cream as garnish.

~and~


photo courtesy of Pillsbury

Cream Cheese Brownie Pie - recipe from Pillsbury, million dollar winner, baby!

Crust:

  • 1 box Pillsbury® refrigerated pie crusts, softened as directed on box
Cream Cheese Layer:
  • 1 package (8 oz) cream cheese, softened
  • 3 tablespoons sugar
  • 1 teaspoon vanilla
  • 1 egg
Brownie Layer:
  • 1 box (15.8 oz) Pillsbury® double chocolate brownie mix
  • 1/4 cup vegetable oil
  • 1 tablespoon water
  • 2 eggs
  • 1/2 cup chopped pecans
Topping:
  • Reserved chocolate syrup packet from brownie mix
  • 3 tablespoons hot fudge topping
DIRECTIONS:

1. Heat oven to 350°F. Place pie crust in 9-inch glass pie plate as directed on box for One-Crust Filled Pie.
2. In medium bowl, beat cream cheese layer ingredients with electric mixer on medium speed until smooth; set aside.
3. Reserve chocolate syrup packet from brownie mix for topping. In large bowl, place brownie mix, oil, water and eggs; beat 50 strokes with spoon.
4. Spread 1/2 cup brownie mixture in bottom of crust-lined pie plate. Spoon and carefully spread cream cheese mixture over brownie layer. Top with small spoonfuls of remaining brownie mixture; spread evenly. Sprinkle with pecans. Cover crust edge with 2- to 3-inch-wide strips of foil to prevent excessive browning; remove foil during last 15 minutes of bake time.
5. Bake 40 to 50 minutes or until center is puffed and crust is golden brown (pie may have cracks on surface).
6. In small bowl, mix chocolate syrup from packet and hot fudge topping. Place mixture in small resealable bag. Cut small hole off corner of bag. Drizzle topping over pie. Cool completely, about 3 hours, before serving. Cover and refrigerate any remaining pie.


     **********     **********     **********

Next up is from Tina, the Mommy at Mommy's Kitchen.  Make sure you check out this FABULOUS dessert as well as all her other tasty dishes!


Photo courtesy of Mommy's Kitchen

Dulce De Leche Pumpkin Cheesecake - to see recipe, click on name and wiggle your nose to be magically transported to her site!

   
  **********     **********     **********

Brandie, aka the Country Cook sent over this luscious dessert that uses the magical Crock Pot!  Love that!
Check out all of Brandie's fabulous dishes either on her Face Book page or at Tasty Kitchen!

Slow Cooker Apple and Pecan Crisp

  • 6 cups Granny Smith Apples (or 6 Medium-sized Apples)
  • 1 Tablespoon Ground Cinnamon
  • ½ teaspoon Ground Nutmeg
  • 1 Tablespoon Lemon Juice
  • ½ cup Old Fashioned Rolled Oats (not the quick cooking kind)
  • ¾ cup Brown Sugar
  • ½ cup White Sugar
  • ¼ cup All-purpose Flour
  • ½ cup Cold Butter, Cut Into Cubes
  • ½ cup Chopped Pecans
Directions:
Spray slow cooker with cooking spray. Peel apples and cut into 1/2-inch thick slices. In a large
bowl, mix apples, cinnamon, nutmeg and lemon juice to coat. Place in the slow cooker.
In a medium bowl, mix oats, brown sugar, white sugar, flour and butter with a pastry blender or
fork until crumbly. Stir in pecans. Sprinkle the crumb mixture evenly over the apples.
Cover and cook on low for 4 to 6 hours. Serve apple crisp with ice cream.
Cook’s Tip: For an added variation, try adding heath toffee bits to this. It makes it taste like a
praline apple crisp
Enjoy!

     **********     **********     **********

And from my kitchen sister at Sublime Hodge Podge, Jill.  She had a GREAT Thanksgiving week last week too, make sure you check out all of her recipes as well!
photo courtesy of Sublime Hodge Podge

Cranberry Orange Buttermilk Bread
  • 2 cups flour
  • 1 1/4 cup light brown sugar, packed
  • 1 1/2 tsp baking powder
  • 1/2 tsp baking soda
  • 1 tsp salt
  • 1 large egg
  • 2/3 cup buttermilk
  • 1 tsp vanilla
  • Zest of 1 large orange
  • 4 tbsp unsalted butter, melted and cooled
  • 12 ounce bag of fresh cranberries
  • 1/8 cup raw sugar (or the packets work fine too)
Start by picking through your cranberries and removing any stems or tossing out any bad ones. Rinse VERY well, drain and set aside.
Preheat your oven to 350 degrees. Spray a 9x5 loaf pan with non-stick cooking spray and set aside. In a large bowl (or your mixer stand bowl), mix together flour, brown sugar, baking powder, baking soda, salt and zest. In a small bowl, whisk together egg, cooled melted butter, buttermilk and vanilla. Add wet ingredients to the dry ingredients and mix well. Fold in the cranberries and pour into the loaf pan. Sprinkle raw sugar over top of the batter.
Bake until golden brown on top and toothpick/cake tester comes out clean, about 1 hour to 1 hour 15 minutes. (check at 1 hour and go from there) Cool for 10 minutes then turn out onto a wire rack to cool completely.

     **********     **********     **********

Keri gives us her Pumpkin Pie recipe that she uses every year!

Perfect Pumpkin Pie


I’ve used this recipe for years, but there’s nothing secret about it. It’s the Eagle brand recipe. I just love it.
For the pie crust, I used my grandmother’s recipe which I’ve included too.

Ingredients:
  • 2 (15oz) cans pumpkin pack
  • 2 (14oz) cans Eagle Brand sweetened condensed milk (not evaporated milk)
  • 4 eggs
  • 2 t. ground cinnamon
  • 1 t. ground ginger
  • 1 t. ground nutmeg
  • 1 t. salt
  • 2 (9 in. unbaked pie crusts)
Directions:
1. Preheat oven to 425 degrees. Whisk pumpkin, condensed milk, eggs, spices and salt in medium bowl
until smooth. Pour into crust. Bake for 15 minutes.
2. Reduce oven temperature to 350 and continue baking for 35 – 40 minutes or until knife inserted 1
inch from crust comes out clean. Cool. Garnish as desired. Store leftovers covered in refrigerator.

Grandma Jean’s Pie Crust

This is the best I’ve used. It’s the vinegar that does the trick. It’s very flaky and yummy! This makes 4
small or 3 large crusts. Can be kept in refrigerator for up to 2 weeks.

Ingredients:
  • 3 C. flour
  • 1 C. shortening
  • 1 t. salt
  • 1 T. vinegar
  • 1 egg
  • 4-5 T water
Directions:
1. Blend flour, salt and shortening with pastry blender until mixture resembles small peas.
2. Make 3 holes in mixture and fill on with vinegar, one with the beaten egg, and one with water. Mix
with fork.
3. Place on floured board and knead with hands until fully blended.


     **********     **********     **********

Holly is back with a twist on a favorite dessert that shakes up the norm...yes, THIS Holly.  The one who makes these super adorable cupcake gift card holders!  Make sure you go check out her Etsy shop!

photo courtesy of Holly

Raspberry Pretzel Salad


Crust:
  • 3 cups crushed pretzels
  • ¾ cup melted butter
  • 3 tablespoons sugar

Jello salad:
  • 1 large box raspberry Jello
  • 8 ounces cream cheese
  • ½ cup sugar
  • 8 ounces Cool Whip
  • 1 package frozen raspberries

For the crust, combine crust ingredients. Spread evenly on bottom of a 9” x 13” pan. Press into dish. Bake at 350° for 10-15 minutes. Remove from oven. Cool.
For the salad, dissolve Jello in 2 cups of water. Refrigerate until partially set. In a separate bowl, blend cream cheese with ½ cup sugar. Carefully combine with Cool Whip. Spread over cooled crust. Remove Jello from refrigerator. Add raspberries (do not thaw) to Jello. Pour over cream cheese mixture spread over crust. Refrigerate. Salad is ready to serve when Jello is completely set.

     **********     **********     *********

Amy treats us with TWO pies!

"Here is a recipe for pumpkin pie. It's from Southern Living and it is AWESOME! It is a long recipe and it takes about an hour to prepare and bake, but it is sooooo worth it!"


Pumpkin Pie Spectacular

Ingredients
  • 1/2 (15-oz.) package refrigerated pie crusts
  • 2 cups crushed gingersnaps (about 40 gingersnaps)
  • 1 cup pecans, finely chopped
  • 1/2 cup powdered sugar
  • 1/4 cup butter, melted
  • 1 (15-oz.) can pumpkin
  • 1 (14-oz.) can sweetened condensed milk
  • 2 large eggs, beaten
  • 1/2 cup sour cream
  • 1 teaspoon ground cinnamon
  • 1/2 teaspoon vanilla extract
  • 1/4 teaspoon ground ginger
  • Pecan Streusel (recipe below)
  • 7 thin ginger cookies, halved
Preparation
1. Preheat oven to 350°. Fit pie crust into a 9-inch deep-dish pie plate according to package directions; fold edges under, and crimp.
2. Stir together crushed gingersnaps and next 3 ingredients. Press mixture on bottom and 1/2 inch up sides of pie crust.
3. Bake at 350° for 10 minutes. Let cool completely on a wire rack (about 30 minutes).
4. Stir together pumpkin and next 6 ingredients until well blended. Pour into prepared crust. Place pie on an aluminum foil-lined baking sheet.
5. Bake at 350° for 30 minutes. Sprinkle Pecan Streusel around edge of crust. Bake 40 to 45 minutes or until set, shielding edges with aluminum foil during last 25 to 30 minutes of baking, if necessary. Insert ginger cookies around edge of crust. Let cool completely on a wire rack (about 1 hour).
Note: We tested with Anna's Ginger Thins.

Pecan Streusel
Ingredients
  • 1/4 cup all-purpose flour
  • 1/4 cup firmly packed dark brown sugar
  • 2 tablespoons butter, melted
  • 3/4 cup pecans, coarsely chopped
Preparation
Stir together flour, brown sugar, melted butter, and chopped pecans.

~and~

Pinto Bean Pecan Pie
"Okay, this is a pecan pie made with Pinto Beans. I know, sounds gross... but oh, so good! And a little bit healthier than the traditional version. This recipe is from my mother-in-law.  Makes 3 pies."
  • 4 eggs, slightly beaten
  • 3 cup sugar
  • 1 cup canned Pinto Beans, drained
  • 2 sticks margarine, melted
  • 2 tsp vanilla
  • 1 c shredded coconut
  • 1 c chopped pecans
  • 3 refrigerated pie crusts

Mix eggs and sugar first (do not beat). Then add remaining ingredients (do not beat). Divide equally into 3 pie shells. Top with whole pecans. Bake 45 min at 350 degrees.

     **********     **********     **********

Amanda gives us her tried and true recipe for Pumpkin Cake:

Pumpkin Cake

  • 1 yellow cake mix
  • 4 eggs
  • 1cup pumpkin
  • 3/4 cup sugar
  • 1 tsp cinnamon
  • 1 tsp nutmeg
  • 1/2 cup oil
  • 1/4 cup water
Bake 50 min @ 350 degrees; for icing, mix 1 box powdered sugar (2C), 1/2 stick of butter softened, 2 tsp vanilla, 8 oz cream cheese softened, and 1C nuts . . . but to be perfectly honest, we always use melted caramel as the icing, and it's deeeelish!

 
     **********     **********     **********

Leslie, Leslie, Leslie....she posted this recipe and I about fell out of my chair!  Seriously, YUM!  Please go immediately to her site and check this bad boy out!

photo courtesy of The Hungry Housewife
 
Cherry Chocolate Brownie Cheesecake - again, click on the recipe name and do a little jig cause this is gettin' good!
 
 
     **********     **********     **********
 
Laura from Real Mom Kitchen supplied us with these oh-so-fabulous treats:
Again, just clickity, click, click the recipe name


photo courtesy of Real Mom Kitchen
Black Forest Cheesecake

photo courtesy of Real Mom Kitchen
Apple or Peach Mini Crostadas

photo courtesy of Real Mom Kitchen
French Silk Pie
 
     **********     **********     **********
 
Amber, the Mommy at This Mommy Cooks brings us some of her favorite desserts as well.  Click on the recipe name and go check them out!

photo courtesy of This Mommy Cooks
Homemade Apple Pie
 
Turtle Cheesecake
 
Banana Pudding
 
     **********     **********     **********
 
Whew!  So have we all gone up about 3 pants sizes yet?!  No, just me?!  Ok, well that figures!
If you have a dessert you would like to link-up, please do so at the bottom of this post.  Thank you for sharing your yummies, please make sure you link back to this post in yours so we can all share the linky lovin'!
On Tuesday, we will be posting some traditions, place settings, and a VERY EXCITING announcement about our 1st giveaway!!! 


Thursday, November 18, 2010

Thanksgiving Side Dish Extravaganza!

Grab a cup of coffee, and enjoy the treat we have for you today!  We have a HUGE selection of side dishes to get you in the menu planning mood.  I am organizing the post by contributor, and if applicable, have linked to their blog or Etsy store in their recipe.  So, go show some love to my great friends!

First up, it's me...again.
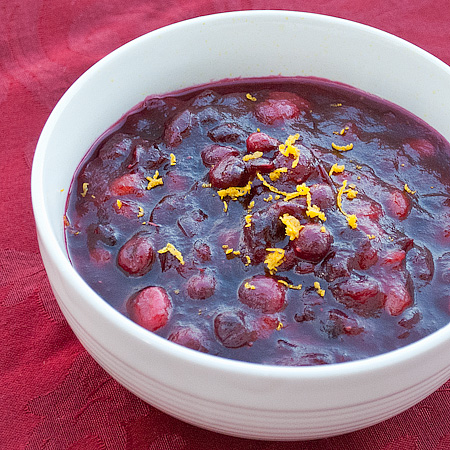
Here is my morphed, tweaked hybrid of a sauce that I serve every Thanksgiving. The Mandarin Oranges really give it a pop of flavor that is perfect with turkey, rolls, or on a sandwich!


Cranberry Mandarin Sauce
  • ¾ cup Orange Juice
  • 2 TBSP Grand Marnier
  • 2 TBSP water
  • 1 cup sugar
  • ½ tsp cornstarch
  • 1 bag fresh cranberries, 10-14 ounces
  • 1 can Mandarin Oranges, 11 ounces, drained
Combine sugar and cornstarch in a bowl, mixing with a fork to ensure no clumping of the cornstarch. In a medium saucepan, combine orange juice, Grand Marnier, and water. Whisk in sugar/cornstarch mixture. Bring to boil over medium-high heat. Reduce heat and allow to simmer for 10 minutes. Add cranberries, return to boil. Reduce heat and boil gently for 15 minutes, stirring occasionally…careful of the popping cranberries! Add drained Mandarin Oranges and stir to break up oranges slightly. Cover and cool completely at room temperature. It will thicken as it cools. Refrigerate until serving time or overnight.

     **********     **********     **********

Dave submits this recipe for his Sweet Potato Casserole saying:
"My wife found this recipe on-line and I was put in charge of making it.  I figured anything with cornflakes, pecans, and marshmallows was good for me, plus my in-laws give me compliments for such an awesome dish."

Sweet Potato Casserole
  • 4 1/2 pounds sweet potatoes
  • 1 cup sugar
  • 1/4 cup milk
  • 1/2 cup butter, softened
  • 2 large eggs
  • 1 teaspoon vanilla extract
  • 1/4 teaspoon salt
  • 1 1/4 cups cornflakes cereal, crushed
  • 1/4 cup chopped pecans
  • 1 tablespoon brown sugar
  • 1 tablespoon butter, melted
  • 1 1/2 cups miniature marshmallows
Bake sweet potatoes at 400° for about 1 hour or until tender. Let cool to touch; peel and mash sweet potatoes.
Beat mashed sweet potatoes, sugar, and next 5 ingredients at medium speed with an electric mixer until smooth. Spoon potato mixture into a greased 11- x 7-inch baking dish.
Combine cornflakes cereal and next 3 ingredients in a small bowl. Sprinkle diagonally over casserole in rows 2 inches apart.
Bake at 350° for 30 minutes. Remove from oven; let stand 10 minutes. Sprinkle alternate rows with marshmallows; bake 10 additional minutes. Let stand 10 minutes before serving.

     **********   **********     **********
My Aunt Ingrid sent me the following recipe/tip (LOVE this idea) for making some festive mashed potatoes:

"Mashed potatoes are obviously a must for Thanksgiving Dinner and when I make them I put them on the table in different colors.
One version goes like this:

Boil the peeled potatoes in salt water for about 10 minutes, then add broccoli florets to the same pot. ( 2/3 potatoes, 1/3 broccoli). When both are done and very soft, add milk, butter, nutmeg and mash. You will have "green" mashed potatoes.
The second version I make as follows:
In a pot with salted water put peeled potatoes and baby carrots at the same time (also 2/3 and 1/3), boil until both are very soft. In a sauteing pan, melt butter (use the same amount as you would for regular mashed potatoes), add chopped garlic and lightly brown. Pour over potato/carrot mix, add milk, some pepper (optional) and mash. Voila - orange mashed potatoes. It gives a nice accent to the dinner table."

     **********     **********     **********
Next up is my friend Holly.
I have to show you this.....


photo courtesy of Holly


 Are you just DYING?!?!
Holly makes these paper cupcakes that are GIFT CARD HOLDERS!!!  Ahhhhh!!  The cuteness!!!
Please, please, PLEASE go check out her Etsy Store by clicking HERE and get the baker in your life some of this preciousness.
Oh yeah, and she cooks!  She gives us the following recipes:

"So my mom has this little promotional recipe book published by Fleischmann’s from the 1970’s or thereabouts. She’s had it for so many years that it bears the stains of kitchen accidents, with pages torn and mauled. All I have is a photocopy of the page with this family treasured dinner roll recipe. Hopefully one day, the entire book will make its way to my kitchen – even if it is one page at a time."


Cold Rise Dinner Rolls  - submitted by Holly
  • 5 to 6 cups unsifted flour
  • ½ cup sugar
  • 1 ½ teaspoon salt
  • 2 packages Active dry yeast
  • 1 cup milk
  • 2/3 cup water
  • ¼ cup (1/2 stick) margarine
  • 2 eggs (at room temperature)
  • Vegetable oil
In a large bowl, thoroughly mix 2 cups flour, sugar, salt and undissolved yeast.
Combine milk, water, and margarine in a saucepan. Heat over low heat until liquids are very warm ( 120° - 130° F). Margarine does not need to melt. Gradually add to dry ingredients and beat 2 minutes at medium speed of electric mixer, scraping bowl occasionally. Add eggs and ¾ cup flour. Beat at high speed 2 minutes, scraping bowl occasionally. Stir in enough additional flour to make stiff dough. Turn out onto lightly floured board; knead until smooth and elastic, about 8 to 10 minutes. Cover with plastic wrap, then a towel. Let rest 20 minutes.
Punch dough down; divide into 3 equal pieces. Proceed according to directions for any of the following shapes:
Pan Rolls: Form each piece of dough into a roll about 10 inches long. Cut into10 equal pieces; form into smooth balls. Place in 3 greased 8-inch round cake pans.
Cloverleaf Rolls: Divide each piece of dough into 12 equal pieces. Form each piece into 3 small balls. Place 3 balls in each section of greased muffin pans, 2 ½ 1 ¼ inches.
Lucky Clover Rolls: Divide each piece of dough into 10 equal pieces; form into smooth balls. Place in greased muffin pans, 2 ½ x 1 ½ inches. With scissors, cut each ball in half, then into quarters, cutting through almost to bottom of rolls.
Fan Tans: Roll each piece of dough into a 9 x 12 inch rectangle. Brush with melted margarine. Cut lengthwise into 6 strips. Stack strips. Cut into 12 1-inch pieces. Place cut side up in greased muffin pans, 2 ½ x 1 ¼ inches.
Twists: Divide each piece of dough into 12 equal pieces. Roll each piece into a pencil shaped 12-inch roll. Fold in half and twist together. Pinch ends to seal. Place on greased baking sheets about 2 inches apart.
Brush rolls with oil. Cover baking sheets or pans loosely with plastic wrap. Refrigerate 2 to 24 hours.
When ready to bake, remove from refrigerator. Uncover rolls carefully. Let stand at room temperature 10 minutes.
Bake at 375°F 15 to 20 minutes, or until done (rolls should make a hollow sound when thumped lightly). Remove from baking pans or sheets and cool on wire racks. If desired, brush with margarine. Serve warm.

Maine Bread Stuffing - Submitted by Holly

My family's not from Maine so I'm not sure why it's called Maine Bread Stuffing but this recipe MEANS Thanksgiving to us. If this stuffing's not on the table, nobody's eatin' dinner until it is!

  • 1 large onion, chopped
  • 4 stalks celery, chopped
  • ¼ cup butter or margarine
  • ¼ cup chopped parsley
  • 1 loaf white bread, cubed
  • 2 teaspoons salt
  • ¼ teaspoon sage
  • ¼ teaspoon savory seasoning
  • ¼ teaspoon marjoram
  • ¼ teaspoon thyme
  • ¼ teaspoons pepper

Chop onion and celery, cook in butter or margarine until tender. Add seasonings. Add to bread and blend well. Place in turkey for stuffing or in crockpot and wet with chicken or turkey stock for larger groups.

     **********     **********     **********

Pass the plate to Jill from Sublime Hodge Podge:
"This is on the table EVERY single holiday....so easy its stupid simple but why have just regular butter when you can have Cinnamon Sugar Butter? It just makes everything taste better. (ok so maybe not mashed potatoes) If you've ever been to Texas Roadhouse or some of those other western steak houses, they serve this butter for their dinner rolls."

Cinnamon Sugar Butter - Submitted by Jill
  • 1 stick of unsalted butter, softened
  • 4 tbsp brown sugar
  • ¼ tsp cinnamon
  • ⅛ tsp nutmeg
Place softened butter into a small mixer bowl and add spice. Whip till fluffy using a hand held mixer. Chill until ready to use.


     *********     **********     **********

Leslie, aka The Hungry Housewife, shares the following AMAZING side dishes with us, along with many laughs.  To see these yummies, please click on the recipe name!

Creamy Philly Peas
Roasted Brussel Sprouts
Sweet Potato Casserole

     **********     **********     **********

Keri, shares more of her bread baking talent with these rolls:

Dixie Rolls

My aunt makes these rolls for every holiday so I rarely have had to make them. They are incredible. My
preference is to use the whole wheat/white flour mix. It adds a little something extra. They take some
planning ahead to make the dough the night before, but it’s worth it!

Ingredients:
  • 1 pkg. yeast
  • ¼ C. very warm water
  • ¾ C. milk
  • 1 cube real butter
  • ½ C. sugar
  • ½ t. salt
  • 3 eggs, beaten
  • 4 C. flour (OR 1 C. whole wheat flour and 3 C. white flour)

Directions:
1. Mix package yeast with very warm water. Let sit until bubbly.
2. Heat milk until very hot. Remove from heat and add butter, sugar, and salt.
3. Let the butter melt and the mixture cool. Then, add well beaten eggs and dissolved yeast and mix
well.
4. Add flour and mix well. Place in a greased, towel covered bowl and refrigerate overnight or for at
least 4 hours. It’s highly recommended to let it sit overnight though.
5. Pat dough into a round on a floured surface. Divide with knife into quarters, and then cut each.
quarter into thirds. Gently flatten each third and roll into crescents starting at the wide end.
6. Place on greased sheets and cover with a towel. Let rise in a place with no draft for about 4 hours.
7. Bake at 350 for about 10 minutes or until lightly browned. Remove to cooling rack. Enjoy!!

     **********     **********     **********

Laura, the Mom in Real Mom Kitchen is back to share some sides.  Including some brilliant recipes for putting your Crock Pot to work for you on turkey day!


photo courtesy of Real Mom Kitchen
 Cranberry Apricot Sauce


photo courtesy of Real Mom Kitchen
Ultimate Slow Cooker Mashed Potatoes


photo courtesy of Real Mom Kitchen
Slow Cooker Brown-Sugared Baby Carrots

     **********     **********     **********

Janice is bringing rolls!  I have personally had these rolls and they are INSANE!  I had this recipe, moved it from state to state and house to house, only to have lost it last year.  I am SO happy I have it again!  One of the things I love about these rolls, aside from their incredible taste, is that you can make the dough up to a week in advance.  I am always a fan of making things easier on Thanksgiving!  You can make the dough 1 or 2 days before, then roll them out in the morning and let them rise all day.  Once the turkey is out of the oven, these go in and you have piping hot, fresh rolls!  Try these, you won't be sorry!

Finger Tip Rolls


Stir into mixing bowl and let stand exactly ½ hour:
  • 1 cup cold milk
  • ½ cup sugar
  • 1 CAKE YEAST (Fleishman’s), break up with fingers*

Add:
  • 2 eggs, well beaten
  • 4 cups flour, sifted (or remove 1 TBSP per unsifted cup of flour)
  • ½ tsp salt
Stir together until well mixed. The dough will be stiff to stir.

Add:
  • 1 cube (1/2 cup) butter, melted

Mix the butter into the mixture. The dough will be “sticky”. Cover and put into fridge overnight. (Keeps up to one week)
Divide dough in half. With the first half, flour the surface of the counter and knead a little flour into the dough. Roll into a circle about ¼ inch thick. Cut into 10-12 “pie shapes”, depending how large you want the rolls. Roll up each wedge from large end to small and tuck point under. Turn in ends if you want them to be like a croissant.
Repeat with other half of dough.
Lightly grease baking sheet and place them 2”-3” apart. Let them stand at room temperature 6-8 hours.
Bake at 350 degrees for 10-12 minutes, until golden brown.

Note: Also rolls out good cinnamon rolls.

*Fleishman’s refrigerated cake yeast is usually close to the butter in the cooler section. Do not use dry powder yeast.

     **********     **********     **********

Amanda brings us three side dishes sure to please everyone!

Aunt Paula's Sweet Potato Souffle

  • 3C mashed sweet potatoes
  • 1C sugar
  • 1/2 tsp salt
  • 2 lightly beaten eggs
  • 1/3 stick margarine, melted (I always use more than this)
  • 1/2C milk
  • Topping: 1/3 stick marg., melted; 1C brown sugar; 1/3C flour; 1C chopped nuts
Mix together main ingredients & pour into greased baking dish; cover with topping & bake 35 min @ 350 degrees or until gold and bubbly.

Buffet Green Beans
  • 3, 16-oz cans cut green beans
  • 8 slices of bacon
  • 1 large white onion, sliced
  • 1/2C sugar
  • 1/2C vinegar
Drain beans and pour into baking dish; place in 200-degree oven to warm; fry bacon and onion together until done but not too dark; remove onions and bacon from drippings and set aside; mix sugar and vinegar together well and pour into bacon drippings; bring to a boil and pour over green beans; place onions and bacon on top and return to oven. Prepare at least 3 hrs before serving; serve warm.

Orange Jello Salad
  • 1 large pkg. orange jello
  • 2C boiling water
  • 1, 6-oz frozen orange juice
  • 1 flat can crushed pineapple w/juice
  • 1 can mandarin oranges w/juice
Mix jello w/boiling water; add frozen OJ, oranges, and pineapple; mix; set in refrigerator.

     **********     **********     **********

Next to the dinner table is Amber, the Mommy in This Mommy Cooks.  To see any of her scrumptious dishes, simply click on the recipe title and you will be magically transported to her page where lusciousness awaits!

Corn Casserole
Hashbrown Casserole
Green Beans
60 Minute Dinner Rolls

     **********     **********     **********

Trudy brings us her stuffing recipe:
  • 1 bag of pepperidge farms seasoned bread cubes
  • 2 cups of turkey pan drippings
  • 1 red onion diced
  • 3 stalks celery diced
  • 1 cup shredded carrots
  • 8 ounces mushrooms diced
  • 1 cup craisins
Bring everything to a boil, except bread cubes.  Add bread cubes, add 1 cup mozzarella cheese and french fried onions to the top.  Bake at 350 for twenty minutes.

     **********     **********     **********

Last, but certainly not least is Mishell's NO Carb Stuffing.

Roasted Garlic “Stuffing”

  • 2 large bunches of celery
  • 1 medium white onion
  • 8 cloves roasted garlic, minced
  • 3 tbsp roasted garlic flavored olive oil
  • 1/2 tsp dry basil
  • Salt and pepper, sprinkle of each (I like a little extra pepper.)
Discard outer darker green stalks of celery. Dice remaining celery.
Dice onion.
Add both to a pan with garlic flavored olive oil.
Cook over medium-medium high heat until tender.
Add garlic, basil, salt, and pepper.
Heat for another minute and serve with meat and gravy!

     **********     **********     **********

Again, a big THANK YOU to all those who submitted recipes!
If you have a side dish recipe you would like to link up for this Side Dish Extravaganza, please link up below and share the linky-lovin' on your post as well!

This post has been linked up to:  Frou Frou Decor, Simply Sweet Home, Tidy Mom , Make Ahead Meals For Busy Mom's, Eat at Home

Tuesday, November 16, 2010

Thanksgiving Main Dish Extravaganza!


Today, we are talking Main Dish ideas.  Are you a traditional "oven roasted turkey and stuffing" family?  Do you cook your turkey in the oven, deep fried, or on the grill?  As for us, we have been grilling our turkey for as long we have been married.  Our first Thanksgiving as newlyweds, we decided to host Thanksgiving at our house....with 20+ people.  Did I mention I was also 9 weeks preggo and in the middle of heave-town?!  Ahhh, memories.  Anyway, that was they year we started making our turkey on the grill.  We did it to save oven room and it turned out so amazing, we have done it ever since then.  We basically put the turkey in a disposable roasting pan filled with stock, butter, and seasonings and let it go on the grill.  One thing I haven't done, that I am remedying this year, is brining the turkey before cooking it.  After seeing some of these brine recipes, you may be on the brine train as well!

     **********     **********     **********

First up from my kitchen sister, Jill from Sublime Hodge Podge brings us this absolutely fabulous, drool inducing lusciousness!  Make sure you go check out all of her amazing recipes!

photo courtesy of Sublime Hodge Podge


Bay and Lemon Holiday Turkey Brine - Submitted by Jill from Sublime Hodge Podge

  • Whole turkey or breast (up to 15 pounds)
  • 2 gallons water
  • 1 c sugar
  • 1 c kosher salt
  • 2 lemons, sliced in ½
  • 4 bay leaves
  • 3 cinnamon sticks
  • Small handful cloves
Combine all brine ingredients in a container or pot large enough to hold the turkey. Make sure all the sugar and salt have been fully dissolved. Add the turkey and refrigerate about 6 hours or overnight. (the longer the better for flavor)
Preheat oven to 350 degrees F.
Remove turkey from brine and transfer to a roasting pan with a rack. Stuff turkey with the lemon halves, bay leaves, and cinnamon sticks used in the brine. Rub turkey skin thoroughly with olive oil and sprinkle with poultry seasoning or salt/pepper. Cook turkey for about 3½ hours, basting every 40 minutes or so. If any part of the turkey gets too brown towards the end of cooking, shield with pieces of tin foil. When the turkey is done, juices should run clear from the breast and the legs should pull away from the bird easily. Remove from the heat and let rest for 15 to 20 minutes before carving.

~and~
photo courtesy of Sublime Hodge Podge

Chicken and Noodles - Submitted by Jill from Sublime Hodge Podge
This is served at EVERY Thanksgiving and made by my mom. Mine never turns out quite like hers but it gets pretty close. LOL Sometimes we make this the day AFTER Thanksgiving and use the turkey instead of chicken. It's really good that way too.
  • 1 whole chicken (or package of chicken breasts with skin and bones)
  • 1 large carrot
  • 1 stalk of celery
  • Parsley
  • Salt & Pepper
  • Water (or chicken broth)
  • 1 can of Cream of Chicken soup
  • 1 large bag (16 ounces) of good quality noodles, thin version
Rinse chicken well and place in large pot. Cover with enough stock or water to cover chicken - usually 3/4th full. Add the carrot and celery. Shake in some salt, pepper and parsley. Bring to a quick boil then turn down to low heat and put lid on pot. Simmer on low for several hours, least 3 to 4 hours. (Broth gets better the longer you cook it.)
Remove the chicken, carrot and celery to a separate platter to cool. Keep the broth in the pot with lid on and set aside. After chicken is cool enough to handle, remove and discard the bones and skin. Cut chicken into bite size chunks. Set aside.
Finely slice the carrot and celery and add them back to the pot of broth. (or you can leave out entirely, up to you.) Place the pot back on stove and bring to a boil. Your pot should be half full of liquid. If not, add more stock or water to make it so. Once it boils, add the entire package of noodles, stirring as you are pouring them into the broth. Immediately lower the heat to medium. Continue to stir often, cooking the noodles for about 10 minutes or so or until tender. When noodles appear done, remove from heat.
Stir in the can of cream of chicken soup. Add more salt, pepper and parsley if needed. Replace the lid and allow the flavors to mingle for a few minutes.
Should the noodles appear dry and soak up all the broth, add a little bit of hot water and stir.

     **********     **********     **********

Next up, we have another way to brine a turkey!
Laura, the Mom in Real Mom Kitchen, brings us another of her A-MAZING dishes!
photo courtesy of Real Mom Kitchen


Savory Turkey Brine - Submitted by Laura at Real Mom Kitchen
To see recipe, please click on recipe title

     **********     **********     **********

And wrapping it up for the Main Dish Extravaganza is a dish brought by Amber, the Mommy from This Mommy Cooks.  I always try to have a ham whenever we have turkey just for variety, and I LOVE that this is done in a slow cooker.  It looks absolutely scrumptious!  Make sure you go to This Mommy Cooks and check out all the amazing recipes she has!

Maple Brown Sugar Ham in Slow Cooker - Submitted by Amber at This Mommy Cooks
To see recipe, please click on recipe title

     *********     **********     **********

Again, if you have a Main Dish idea you would like to share, be sure to link up below, linking back to this post in yours to share some linky-lovin'.
On Thursday, we have a HUGE, HUGE, HUGE amount of yummy side dishes to share!!!
I am linking this post to:  Nikki's Nifty Knacks, Tidy Mom, Frou Frou Decor, Simply Sweet Home   , Make Ahead Meals For Busy Mom's

Sunday, November 14, 2010

Thanksgiving Appetizer Extravaganza!

WELCOME to our 1st Annual Siggy Spice and Friends Thanksgiving Dinner! 

Today we start with Appetizers. 
Before we get going, I just wanted to say a huge THANK YOU to all those that contributed recipes!  I have had such fun going through them and I have added many-a-dishes to my Thanksgiving menu.  I hope you all find as much inspiration and joy reading them as I did! 
I am also including a "linky" at the end of this post in case there are some people who wish to share some appetizers!
We didn't have too much as far as appetizers, but WATCH OUT, we have some A-MAZING recipes coming up in the main dish, side dish, and dessert category!
I will start the sharing with an appetizer that makes it's way onto every holiday table we have.  I love, love, LOVE it! 

Baked Brie
  • 1 round loaf of bread.  Sourdough, Rye, Tuscan, Shepherds Bread...your choice
  • 1 wheel of Brie cheese that fits your bread bowl
  • 1/4 cup or more Extra Virgin Olive Oil
  • Garlic Powder to taste
  • Fresh ground pepper to taste
Preheat oven to 350 degrees.
Using a serrated bread knife, remove the top of the bread bowl making sure to allow just enough height for the Brie wheel.  Using your Brie as a guide, carefully cut out the middle of the bread bowl so your cheese can fit in snugly.  Make sure you reserve the top of the bread bowl and the filling you removed.
Using a pasty brush, brush Extra Virgin Olive Oil all over the inside of the hole and sprinkle with garlic powder.  Remove Brie from wrapping, keeping the rind on, and set in bread bowl.  Set bread bowl on a cookie sheet and bake in oven for 20-30 minutes or until it is starting to puff up in the middle and is getting nice and melty.
Meanwhile, cube up your reserved bread from the middle and top of bread bowl into bite sized cubes. 
Remove baking sheet from oven and place bread cubes all around the bowl.  Lightly brush the cubes of bread with Extra Virgin Olive Oil and sprinkle with garlic powder and fresh cracked pepper.  Return the baking sheet with the bread bowl and bread cubes back to oven for an additional 15 minutes or until the bread cubes are nice and toasted.
Once you plate your appetizer, cut off the top of the rind to expose all that melty goodness!

Also, from me:

Cranberry Mandarin Brie Phyllo Bites
  • 1 small wedge of Brie cheese
  • 1/2 cup Cranberry Mandarin Sauce , click HERE for recipe
  • 30 frozen pre-cooked miniature phyllo shells, defrosted
Preheat oven to 350 degrees.
Place phyllo tarts on a baking dish and put 1 tsp of Brie cheese in each tart.  Place in oven and bake for 15 minutes or until the cheese is nice and melty. Once plated, top Brie with 1/2 tsp of Cranberry Mandarin Sauce.  Beware, these are completely addictive!!!

Next up, the ever-amazing Laura from Real Mom Kitchen sends us some appetizer love with this gem!

photo courtesy of Laura at Real Mom Kitchen

Cranberry Cream Cheese Spread
Please click HERE to go to Real Mom Kitchen to get the recipe!


This last one amazes me!  I was not sure if I should put it under appetizers, side dishes, or table settings.  However, I figured that since so many of us do a veggie try as an appetizer, I would put it here.   Keri made this beautiful presentation and I am SO glad I now know how to do it!  Take a look, isn't it INCREDIBLE?!?!

photo courtesy of Keri
Cornucopia - submitted by Keri

I actually got this from Allrecipes.com (submitted by Becky), if you want to check user comments for
additional ideas. The trick to making this recipe a success is really perseverance because the aluminum
foil form has to be slick in order not to stick to the bread, but that makes it very slippery too! The bread
kind of wants to slide off the form. I just worked with it until it looked “okay” on the form and it all filled
in and looked much better after baking.

Ingredients:
  • 3 (11 oz) containers refrigerated soft bread stick dough
  • 1 egg
  • 1 TBSP water
  • Fill with whatever you want.  I chose fresh veggies.
Directions:
Preheat oven to 350 degrees F. Lightly spray a cookie sheet with non-stick cooking spray.
Tear off a 30X18 inch sheet of heavy duty aluminum foil. Fold it in half to 18X15 inches. Roll diagonally
to form a hollow cone, about 18 inches long with a diameter of 5 inches at the widest end (this will be
the cornucopia opening). Stuff cone with crumpled regular foil until form is rigid. Bend tail of cone up,
then down at the end. Spray outside of cone with non-stick cooking spray. Place on cookie sheet.
Beat the egg with water to make a glaze. Open and unroll the first can of breadstick dough on your
work surface. Separate breadsticks. Begin by wrapping one breadstick around the tip of the cone.
Brush the end of the next breadstick with glaze and press to attach it to the end of the first breadstick.
Continue spiral wrapping cone, slightly overlapping dough until there are 3 breadsticks left.
Pinch one end of the 3 breadsticks together, then braid. Brush bread around the opening of the
cornucopia with the glaze. Gently press on braid. Brush entire cornucopia with glaze.
Bake at 350 for 45 minutes or until bread is a rich brown. If parts darken too much, cover with pieces
of foil.
Remove from oven and let cool completely on cookie sheet on a wire rack. Carefully remove foil
when cool. If freezing, leave foil in bread for support and remove when thawed.

Remember on Tuesday we start the Main Dish recipes, tips, and techniques!  If you have anything you would like to contribute, you can still e-mail me for the upcoming categories.  Click HERE to see the categories and publish dates.
Now, if you have some appetizers you would like to share, please feel free to link-up below!  Make sure you link back to this post somewhere in yours so we can all share the linky-o-lovvee!

This post has been linked up at: Mommy's Kitchen, Cookbook Sunday, Nikki's Nifty Knacks, Frou Frou Decor, Simply Sweet Home, Tidy Mom, Make Ahead Meals for Busy Mom's, Eat at Home


Friday, November 12, 2010

Siggy Spice and Friends 1st Annual Thanksgiving Dinner Reminder

Happy Friday my friends!

photo courtesy of Muir Woods
 Just a reminder that if you were going to submit some recipes for the Siggy Spice and Friends 1st Annual Thanksgiving Dinner, I would LOVE to have your recipes by tomorrow!
Again, if you don't have a food blog, NO PROBLEM, just e-mail me your recipe with or without pictures. 
If you do have a food blog, please e-mail me the link and I will get everything linked for you OR I will also (try) to post a McLinky with each category.
There are many of you that also have an Etsy shop, website, blog, or home business.....make sure and include that information with your website so everyone can see your goods!
E-mail:  siggyspice(at)gmail(dot)com

Have a FABULOUS weekend!!!

Wednesday, November 10, 2010

Loaded Chicken Philly Sammies

Chicken Philly Sammies PLUS Homemade Hoagie Rolls (or hamburger buns, or french rolls, or whatever shape you want to make them into roll)  PLUS a pretty please :)
First, the Loaded Chicken Philly Sammies. 
I adapted this fabulous recipe from my dear bloggy friend Jill Pickle, who adapted it from The Country Cook.  So, here is my version, loaded with EVERYTHING!

Ingredients:
  • 4 slices of thick sliced bacon, chopped into bite-sized pieces
  • 2 TBSP butter
  • 1 pound of boneless skinless chicken breast, diced into bite-sized pieces
  • 1/2 large sweet onion, diced
  • 1 bell pepper (your choice, green, yellow, or red....or a combo), sliced
  • 6 ounces white button mushrooms, sliced
  • 2 TBSP lemon pepper seasoning
  • 1/2 tsp kosher salt
  • 4 slices of provolone cheese
  • 4 hoagie rolls, recipe below.  Feel free to substitute whatever bun you or your bakery may have
  • REAL, good quality mayo.  I like Hellman's or Duke's best, but for gracious sake, do NOT use Miracle Whip!

Chunk up your chicken, toss into a bowl and season with lemon pepper and salt. Stir to coat all the pieces well.  Add the diced onion, sliced pepper and mushrooms to the chicken bowl.
In a skillet over medium-high heat, add your chopped bacon and cook for a few minutes until done. Scoop out and drain on a paper towel. Set aside. Leave the bacon grease in the pan. Add 2 tablespoons of butter to the bacon grease. Turn heat down to medium.
Toss in the chicken/veggies into the bacon/melted butter and cook for 8 minutes or so, stirring often to break up the pieces and evenly cook on all sides. Add in the bacon and stir. (taste now for additional salt or pepper if you need)
In the skillet, divide up the chicken mix into 4 portions and separate. Add a piece of provolone cheese to each portion and allow to melt over top. While cheese is melting, put mayo on both sides of your bun. Scoop your portion onto your buns and serve.

Now, onto these A-MAZING Hoagie Rolls!
It should be no surprise that Mel, from My Kitchen Cafe, is a favorite of mine.  This recipe for her French Bread Rolls morphs by shape into whatever I need it to be.  It truly is a fabulous sandwich roll.  I have used it as hamburger buns, hoagie rolls, and just as a sandwich roll.  You won't be disappointed....and I have to say, adding a freshly made roll to any sandwich really ups the flavor!

Ingredients:
  • 1 1/2 cups warm water (110 degrees F/45 degrees C)
  • 1 tablespoon active dry yeast
  • 2 tablespoons white sugar
  • 2 tablespoons vegetable oil
  • 1 teaspoon salt
  • 4 cups all-purpose flour

In a large bowl, stir together warm water, yeast, and sugar. Let stand until creamy, about 10 minutes.
To the yeast mixture, add the oil, salt, and 2 cups flour. Stir in the remaining flour, 1/2 cup at a time, until the dough has pulled away from the sides of the bowl. Turn out onto a lightly floured surface, and knead until smooth and elastic, about 8 minutes. Lightly oil a large bowl, place the dough in the bowl, and turn to coat. Cover with a damp cloth, and let rise in a warm place until doubled in volume, about 1 hour.
Deflate the dough, and turn it out onto a lightly floured surface. Divide the dough into 12-14 equal pieces, and form into round balls....or shape into whatever shape you need it to be.  Place on lightly greased baking sheets at least 2 inches apart. Cover the rolls with a damp cloth (or greased saran wrap), and let rise until doubled in volume, about 40 minutes. Meanwhile, preheat oven to 400 degrees.
Bake for 12-13 minutes in the preheated oven, or until golden brown.  If you want the top crusty, spray some water into the oven a couple times in the first 5 minutes of baking.


photo courtesy of Muir Woods


And now, for the pretty please.
Pretty please E-MAIL me your favorite Thanksgiving recipes by this Saturday. 
This is a great way for all of us to share recipes....especially those without a blog!
Just send your recipe to:  siggyspice(at)gmail(dot)com and if you have anything you would like to promote, i.e., Etsy Shop, Blog, Website, Business, etc.  give me that information as well and I will publish it along side your recipe.

These recipes are linked up at:
Nikki's Nifty Knacks
Tidy Mom
Simply Sweet Home
Frou Frou Decor
Eat at Home