Sunday, June 27, 2010

Ham and Swiss Party Rolls

I hope you all had a great weekend! 
Today's recipe is one of those scrumptious, why-haven't-I-tried-you-before foods that is perfectly versatile!You can make it as an appetizer, snack,. lunch, or dinner.   I have had people tell me they take it to Bunco parties, people who make it as a change of pace to normal ham and cheese sandwiches, people that make it to sit and much on while they drink an adult beverage watching True Blood getting lost in all the vampire hotness....or maybe that one was just me, haha!  Whatever the reason for making them, you won't be disappointed!

Ingredients:
  • ½ pounds Sliced Ham
  • 5 slices Swiss Cheese
  • 1 package King's Hawaiian Rolls
  • ½ cups Melted Butter
  • ½ teaspoons Worcestershire Sauce
  • ½ teaspoons Dry Mustard
  • 1-½ teaspoon Onion Powder
  • 1 Tablespoon Poppy Seeds
The rolls will look like a large solid piece of bread. Leave the rolls intact and slice the loaf in half with a long knife to form a top layer and a bottom layer.
Place ham and cheese on bottom layer of rolls, then place top layer of rolls over ham and cheese and place in a 9×13 pan. Mix together melted butter, Worcestershire, dry mustard, and onion powder. Pour mixture over top of rolls and sprinkle poppy seeds over top.
Bake at 350F for 15-20 minutes.


Recipe Source:  Tasty Kitchen member Tidy Mom

This recipe has been linked up at:
Mommy's Kitchen Sunday Potluck

Saturday, June 26, 2010

Menu Plan 6/25-7/2

It has been a couple weeks since I did a menu plan, and boy did my stress level and wallet feel it! It continue to astounds me how much money you save when you plan your meals, make a good list, and don't need to go to the store for random items. Not to mention, you don't have to think about the whole "what is for dinner" thing for a whole week.....though I do reserve the right, as the head chef, to switch things around :)  What is going to be on your table this week?
Friday
     Lunch - Cold-Cut Sandwiches, Cheese Crackers, Peaches
     Dinner - Cheeseburgers, Potato Wedges
Saturday
     Lunch - Chili Dogs, Carrots and Celery with Ranch Yogurt Dip
     Dinner - out for dinner
Sunday
     Lunch - Macaroni and Cheese, Frozen Grapes
     Dinner - Beer in the rear chicken, Crash Hot Potatoes, Grilled Veggies (medley of
                   peppers, onions, mushrooms, and asparagus)
Monday
     Lunch - Hot Hoagies, Fresh Fruit
     Dinner - Beef Mac, Salad
Tuesday
     Lunch - Chicken Fried Rice, Potstickers
     Dinner - Crockpot Brown Sugar Chicken, Steamed Rice, Stir-Fry Veggies
Wednesday
     Lunch - Sloppy Joes, Chips, Carrots and Ranch Yogurt Dip
     Dinner - Red Rocker Margarita Chicken Soft Tacos, Pineapple Salsa
Thursday
     Lunch - Tuna Salad Sandwiches, Salad, Fresh Fruit
     Dinner - Cranberry Pork Tenderloin, Rice Pilaf, Garlic Almond Green Beans
Friday
     Lunch - shopping....probably have a Costco lunch
     Dinner - Swedish Meatballs, Parsley Egg Noodles, Peas, Butter-Dipped Biscuits

Thursday, June 24, 2010

Asian Chicken Salad

Holy frijoles, it is hot, hot, HOT here!  Two new words have been introduced to my vocabulary since moving to the East Coast....heat index.  Because I feel like a slug when it this hot, I look for easy, preferably NON-cooking foods for dinner as often as I can.  This recipe completely totally rocks that bill.  Another great thing about this recipe is that it uses about 1/2 of a chicken.  Guess what else uses 1/2 a chicken??  Hot Hoagies!  So, either bake a chicken or take a little help from the store and get a rotisserie chicken then you can do as I did and have Hot Hoagies one night and this gem the next.  I think this recipe would also be FABULOUS with some mandarin oranges thrown in.  Give it a try, let me know what you think, and stay cool my friends!

  • 1 package (3 ounces) oriental-flavor ramen noodle soup mix
  • ½ cup pre-sliced almonds
  • Red Wine Asian Vinaigrette, recipe below, use entire amount
  • 1/2 package (whole bag is 14-16 ounces) coleslaw mix or broccoli slaw mix
  • 1 package romaine lettuce (10 ounces)
  • 2 cups shredded cooked chicken
  • ½ cup fresh cilantro leaves (optional)
  • 2 scallions, both white and light green parts, chopped

Homemade Red Wine Asian Vinaigrette:
  • ¾ cup vegetable oil
  • 6 tablespoons red wine vinegar
  • 4 tablespoons sugar
  • ½ teaspoon black pepper
  • 1 Ramen noodles Oriental flavor seasoning packet
Whisk vinaigrette ingredients together or place in jar and shake.


Preheat the oven to 350 degrees. Break up the ramen noodles with your hands and place them and the almonds on a rimmed baking sheet. Bake until the noodles and almonds turn light brown, 7 - 9 minutes. Watch carefully so they don't burn.

Meanwhile, Make the salad dressing below and set aside. Place the slaw mix, romaine lettuce, chicken, cilantro and scallions in a large serving bowl.

Toss to combine the ingredients well. Just before serving, pour the salad dressing over the salad and toss to coat. Scatter the toasted almonds and noodles on top and serve.

Recipe Source:  The Dinner Doctor

This recipe has been linked up at:
Mommy's Kitchen Sunday Potluck
Eat at Home

Tuesday, June 22, 2010

Weekend fun with a two-fer recipe!

Happy Tuesday!  Whew!  What a weekend!   
My sweet baby girl turned 6 on Friday, and she had her birthday party Saturday. One of the great things about her birthday being in June is we can almost always have a party outside. This year, we had a backyard birthday party...complete with TONS of kids from the neighborhood.  We created a 50 ft. slide and slide going down the hill, and had a large assortment of water toys to play with.
She had a BLAST!
Now moving on to the cake....some times you win, and sometimes you lose.
I spent the Friday night and Saturday morning making and decorating this cake, definite win in my opinion!

The bottom layer was a white cake with a Strawberry Cheesecake Mousse filling.  It was scrumptious!
Now, in my head, I was going to decorate the top with assorted pink cake pops to carry on the polka-dot theme.  Friday night, I baked the cake and prepared the cake balls, stuck a stick in them, and placed them in the freezer.  Now, FOR THE RECORD, the recipe did state to chill them for a couple hours in the fridge or speed it along in the freezer, and I had them in the freezer overnight.  Anyway, Saturday morning, I melted some pink vanilla candy melts (maybe this was my problem, is there a difference between candy melts and candy bark?) and proceeded to try to coat the now frozen cake pops.  UGH!  Disaster!  I am pretty sure I stuck the sticks too far down, because, well, they we pushed all the way down.  So, the annoying little suckers slid down the sticks and I could not get them dipped in the coating.  So, I tried using a spatula to coat them, but since the candy melts were seizing against the FROZEN cake pops, it was a MESS!!!  I got 6 of them that stayed on the stick. 

Now, let me say, they were SCRUMPTIOUS!!!  But if any of you have ventured into the cake ball/cake pop realm....if you have any thoughts on what I did wrong, PLEASE let me know because as ticked off as I was, they were so stinking good, I would definitely try them again!
So, for the two-fer...here is the recipe for the Strawberry Cheesecake Mousse, which works great as a cake filling or as a pie filling (think graham cracker crust) and the cake balls.

Strawberry Cheesecake Mousse Pie
  • 1 block cream cheese (8 ounces) at room temperature
  • 1 box strawberry jello, divided
  • 2/3 cup plus 2 TBSP sugar, divided
  • 5 LARGE strawberries
  • 4 - 8 ounces Cool Whip, depending on taste and consistency you like
Start by slicing 5 strawberries in a bowl and sprinkle 2 TBSP sugar and 1 tsp strawberry jello powder over top. Stir to coat. Set aside.
In a medium bowl, cream together cream cheese, 1 TBSP strawberry jello, 2/3 cup sugar. Beat until fluffy.
With a fork, mash the five strawberries that were macerating. Pour into cream cheese mixture. Beat with mixer until well combined. Gently fold in Cool Whip.

Cake Balls - Cake Pops via Bakerella
  • 1 box cake mix, cook as directed on box for 13 X 9 cake.  I used Devil's Food cake mix.
  • 1 can frosting (16 oz.).  I used cream cheese frosting.
  • 1 package chocolate bark, regular or white chocolate.  I used candy melts....maybe that is what I did wrong
  • wax paper
1. After cake is cooked and cooled completely, crumble into large bowl.
2. Mix thoroughly with 1 can frosting. (It may be easier to use fingers to mix together, but be warned it will get messy.)
3. Roll mixture into quarter size balls and lay on cookie sheet. (Should make 45-50. You can get even more if you use a mini ice cream scooper, but I like to hand roll them.)
4. Chill for several hours. You can speed this up by putting in the freezer.  Again perhaps this is what I did wrong?
5. Melt chocolate in microwave per directions on package.
6. Roll balls in chocolate and lay on wax paper until firm. (Use a spoon to dip and roll in chocolate and then tap off extra.)

Wednesday, June 16, 2010

Sweet and Sour Chicken

Happy Wednesday! 
My first experience with homemade Chinese food was when I was a teen.  I was sick and a certain older female, maternal person in my life...whom I love dearly....who reads this blog, tried to make was nice enough to make me my favorite, Lemon Chicken. 
Now, something about this woman, let's call her Das Frauline, she is German after all...she is a  former model....here, take a look.


Isn't she beautiful!  Hopefully when she reads this, she will be so happy and honored to see her gorgeous self on here, she will forgive me for sharing the rest of this story....
Anyway....Das Frauline is a German who married a man that was a steak and potato fed boy that grew up on a farm in Nebraska.  She had no business experimenting in ANY ethnic cuisine, especially Chinese food, when she had made nothing but steak and donuts (oops, BUSTED) for the last 16 years.  But she did.  As I sat on the couch, sick as a dog, she handed me a bowl with a gray-ish hued chicken leg.  The gray-ish hue was somewhat masked by a tang-orange colored sauce.  When I asked her what it was, she said "Vell," in her German accent "I did not have any lemonade, so I found some frozen orange, banana, pineapple juice concentrate in the freezer and boiled the chicken in that"  She was so proud.....I was so sick.... let your imagination roll through all of your senses with that for a moment....
Moving on, I had tried a couple recipes here and there for Chinese food, and all of them giving me a less harsh memory of that sickly day.  I gave up.  Obviously, the only way I would get some good Chinese food was to call out for it.  One day, I was perusing my blogs, and found that Melanie from My Kitchen Cafe had a recipe for Sweet and Sour Chicken.  I had bookmarked it, but didn't do much else.  A week later, on Tasty Kitchen, I saw that the exact same recipe, submitted by Melanie, was racing to the top of the "Most Popular" list, with high ratings and praise.  I took that as a sign and made it.  I am SOOOOO glad I did!  This recipe, my whole family has decided, is better than anything you would ever get in a restaurant!  Another one of those recipes that you can't imagine it from the ingredients, but, again....those flavor fairies do their thing!  It is a bit involved, so do it when you have a bit of time to dedicate to it, but I promise you won't be disappointed.  The only thing I did differently was while the chicken was on it's last 15 minutes in the oven, I chunked up some green pepper, onion, and pineapple.  I sauteed that trio on medium-high heat until slightly softened then added to the chicken once it was out of the oven. 
Enough...you HAVE to make this!!!

Ingredients:

Chicken:

3 boneless, skinless chicken breasts
Salt and pepper
1 cup cornstarch
2 eggs, beaten
1/4 cup canola oil

Cut boneless chicken breasts into chunks. Season with salt and pepper. Dip chicken in cornstarch and then in egg. Fry in a little oil until brown but not cooked through. Place in a single layer in a baking dish. Mix sauce ingredients (below) together and pour over chicken.
Sauce:
¾ cup sugar
4 tablespoons ketchup
½ cup vinegar (either apple cider vinegar or regular white work great)
1 tablespoon soy sauce
1 teaspoon garlic salt

Bake at 325 degrees. Turn chicken every 15 minutes for one hour.

Optional, Siggy Spice Style
1/2 green pepper, chunked
1/2 yellow or white onion, chunked
1/2 can (20 oz) pineapple chunks, drained

Saute green pepper and onion in 1 TBSP vegetable oil over medium high heat until just softened.  You still want the veggies to have crunch to them.  Once they hit that stage, add in pineapple and continue cooking just until warm.  Add to chicken once it is out of the oven.  Serve over rice.

YUM-I-LICIOUS!!!!

This recipe has been linked up at:
Mommy's Kitchen

Monday, June 14, 2010

Philly Cheesesteak Crecent Pizza

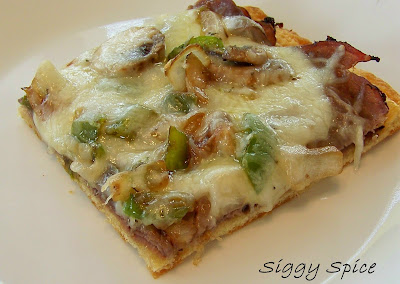
Don't you just love it when new goals go wonky the first week?!  I didn't put the menu plan up on Friday because I am not entirely sure what we are doing for dinner this week yet.  Kiddo D is coming tomorrow for the summer.  I love it when Kiddo D is with us, not just because I love him and it makes our family feel complete when he is here, but he is a very vocal enthusiast of my cooking.  LOVE IT!  So, I like to have him help me plan out our menu so he can try all the things we experimented with while he was gone.  SO, no official menu plan this week.  One thing we are all excited to have him try is this Philly Cheesesteak Pizza!  If you are anything like my Hubby, and the thought of a Philly Cheesesteak Pizza completely skeeves you out, you will be oh-so-relieved to hear that this isn't so much a pizza as an open faced sandwich.  If you have ever made Philly Cheesesteaks for the family, you know that it is easy....this, however, is even easier since you don't make each one individually.  When I made this one, I left the veggies off of a couple pieces for the little kiddos.  Give it a try and let me know what you think!

Ingredients:
  • 1 can (8 oz)  refrigerated crescent dinner rolls
  • 8 oz thinly sliced cooked roast beef (from deli)
  • 1 tablespoon Italian dressing
  • 1 to 1 1/2 cups shredded mozzarella, Italian Blend, or Provolone cheese.  I used sliced Provolone on top of the beef and then sprinkled some shredded Mozzarella over top of the veggies 
  • 2 tablespoons olive or vegetable oil
  • 1 cup coarsely chopped green bell pepper
  • 1 cup coarsely chopped onions
  • 1 cup sliced button mushrooms
  • 1/2 teaspoon beef-flavor instant bouillon
Heat oven to 375°F.

Unroll dough in ungreased 13x9-inch pan. Press in bottom and 1/2 inch up sides. Firmly press perforations to seal.
Wrap beef tightly in foil. Place dough and beef in oven.
Bake about 10 minutes or until crust is light golden brown. Arrange warm beef over partially baked crust. Brush with dressing. Top with cheese.
Bake 8 to 10 minutes longer or until edges of crust are golden brown and cheese is melted. Meanwhile, in 8-inch skillet, heat oil over medium heat until hot. Add bell pepper, onions, mushrooms, and bouillon; cook and stir 3 to 5 minutes or until tender. Spoon cooked vegetables over melted cheese.  (If you do it like I did, sprinkle Mozzarella cheese over veggies and place under broiler for a quick melt for a  minute or so.)

 
Recipe Source:  Pillsbury Bake Off Cookbook

This recipe has been linked up at:
Mommy's Kitchen

Friday, June 11, 2010

Be Our Guest Berry Salad

As I have told you before, I grew up in an itty-bitty town in Colorado.  Our lunch room was used for the Elementary, Jr. High, and High School.  Yes, that means, as 1st graders, we were sitting on our knees trying to get tall enough to reach our trays.  Years later, the same Winnie the Pooh mural painted walls were there as we, then high schoolers, would squeeze into the same white picnic-type tables and benches.   We had one of those lunch rooms that had an actual kitchen.  That actual kitchen was ran by neighborhood grandmothers and mothers that cooked and baked everything from scratch.  Imagine my shock when I went to my daughters school and saw their lunchroom was really nothing more than a warming station where they would reheat processed, pre-packaged food.  Food that seemed like it would come from a fast food joint or a concession stand at a high school basketball game.  Jamie Oliver's Food Revolution anyone?!?!
Anyway, earlier in our homeschooling year, we did a unit on nutrition.  Teaching my kids about the type of food their body needs everyday and why.  Teaching what happens to your body when you give it the wrong type of food.  In case you are interested, Time for Kids has some GREAT age based worksheets on nutrition and physical activity.  When we were done with the unit, I wanted to reinforce this knowledge in a practical way, so it became a duty of theirs to help with the menu planning.  5 (almost 6) year old Kiddo C plans the snacks everyday, and 9 year old Kiddo B plans our lunches.  They make sure we get the right amount of food groups in our daily menu as well as making sure that we have the not-so-good-for-us stuff in moderation.  I purchased several kid focused cookbooks to help them get ideas and inspiration. 
Which brings us to today's recipe.  This kiddo friendly recipe shows that when you give something a fun name and add some happy colors and fruits that they like, they will eat and LOVE some amazingly nutritious food.  Lunches can be fun, flavorful, AND nutritious while still being quick and easy. 

Ingredients:
  • ¼ cup orange juice
  • 1 TBSP salad oil
  • 2 tsp honey mustard or Dijon mustard
  • 1 tsp sugar
  • ¼ tsp salt
  • 4 cups torn lettuce
  • 1 ½ cups fresh blueberries, raspberries, quartered strawberries, and/or canned mandarin orange sections, drained
  • 2 TBSP cheddar or pretzel goldfish
~To make the dressing, put the orange juice, oil, mustard, sugar, and salt in a screw top jar. Tightly cover with the lid and shake until combined. Put the lettuce in a medium bowl and drizzle the dressing over top. Gently toss to coat with dressing, Divide lettuce among 4 plates.
~Put the fruit on lettuce and sprinkle with the goldfish crackers.
(For a dinner salad, add cooked chicken)


Recipe Source:  Belle and the Beast, Disney's Magic Kingdom Cookbook

This recipe is linked up at:
Simply Sweet Home
Tidy Mom
Mommy's Kitchen
Eat at Home

Wednesday, June 9, 2010

Hot Hoagies

Happy Wednesday my friends!  If you are on the Siggy Spice Face Book page, you will remember last week I told you about an amazing new recipe we tried and LOVED.  I promised that would be the next recipe posted.  But then I made the homemade pancake syrup and in my giddiness (not to mention lack of sleep from a giggly, girlie slumber party the night before) I totally forgot about that promise.  Sorry! 
When I lived in Colorado, we had a King Soopers right down the road from our house.  Everyday at 4:00 pm, 5:00 pm, and 6:00 pm they would bake fresh french bread.  No matter what we were having for dinner that night, if I had to run to King Soopers for something, french bread would appear on the table with it.  The smell was INTOXICATING!  Yummy, crispy, chewy french bread is the perfect base for this cheesy, chicken salad like topping that gets gooey and fabulous when baked.  This yumilicious, super simple grub is a wonderful summer meal.  We rounded out the meal with a salad and a plate of fresh fruit...absolute perfection!

Ingredients:
  • 1 loaf french bread, cut lengthwise
  • 2 cups cooked, shredded chicken (take some help from the store and get a store bought rotisserie chicken.  You will use about 1/2 the meat to equal 2 cups)
  • 1/2 cup mayo (you can use light)
  • 1/2 cup  sour cream (you can use light)
  • 2 green onions, thinly sliced (white and green parts)
  • 1/2 teaspoon garlic salt
  • 1/3 cup fresh flat leaf parsley, chopped
  • 2 cups shredded cheese (I used medium cheddar)
Preheat oven to 350 degrees. Place french bread on large baking sheet. Mix all topping ingredients together in a bowl. Spread topping evenly on top of both lengths of french bread. Bake for 15-20 minutes until bubbly and edges are lightly browned. Slice into pieces and serve immediately.

Recipe source:  Real Mom Kitchen

This recipe is linked up at:
Simply Sweet Home
Tidy Mom
Mommy's Kitchen

Sunday, June 6, 2010

Liquid Gold - Homemade Pancake Syrup

I had a different recipe lined up to share today, but this morning I made some pancakes for a bunch of giggling girls that had a sleepover last night.  Since the sleepover was a last minute plan, I did not put "pancake syrup" on my grocery list for the week.  However, I had been saving a recipe for a homemade pancake syrup for the next time we had pancakes, waffles, french toast, or Fluffy French Toast.  I already had all the needed ingredients in my fridge and pantry, total bonus!  Even bigger bonus, this was silly simple and CRAZY good!  Everyone LOVED, LOVED, LOVED it!  It is a butter-y, caramel-y, maple-y luscious syrup that has forever convinced me to never buy store bought syrup again.

Ingredients:
1 stick butter
1 cup sugar
1/2 cup milk
1/4 tsp baking soda
1 tsp vanilla extract
1 tsp maple flavoring (found with all the extract flavors in the baking aisle)

In a medium pot over medium-high heat (you need enough room for this to boil), bring all ingredients to a rolling boil for 2-3 minutes.  Watch very carefully so the mixture does not over boil all over your stove.
This recipe serves about 5, so you may want to double for a large family.  Leftovers can be stored in the refrigerator, simply reheat in the microwave.


Recipe Source:  Tasty Kitchen member kmgregson

This recipe is linked up at:
Mommy's Kitchen Sunday Potluck

Friday, June 4, 2010

Menu Plan Friday


I am setting out some lofty goals for Siggy Spice that I thought I would share with you and maybe (please, please) get your thoughts on them as well.
  1. I have started putting my Weekly Menu Plans on the Siggy Spice Face Book page, but I am going to post it here as well on Fridays.  Because the blog is so new, there may not be links to the recipes yet, BUT I love getting inspiration from seeing what others are cooking for the week.  So feel free to use this as a virtual think tank of ideas and please share yours as well!
  2. With summer break here, I want to take a day of the week and post a kiddo specific meal, snack, or idea.  Some might be things you have seen or heard of before, but there may be something new to incorporate into your repertoire.
  3. I am going to bring back "Favorite Finds".  I love hearing about products that people love that I may have never tried.  This can be food items or other things that have made my life easier or made me smile.
OK, onto the menu plan for this week...INCLUDING LUNCHES, you know summer break and all brings the need for some creative lunches.

Friday
     Lunch - Triangle Crescent Bread topped with PB& Honey and fresh fruit
     Dinner - Panko crusted Tilapia, Potato Wedges, Coleslaw

Saturday
     Lunch - Costco
     Dinner - BBQ Cheeseburgers, Baked Fajita Fries, BBQ Beans

Sunday
     Lunch - Hot dogs, chips, apples
     Dinner - BBQ Country Style Ribs, potato salad, corn on the cob

Monday
     Lunch - Octopus on Seaweed, Goldfish, Apricots
     Dinner - Sweet and Sour Chicken, Rice, Potstickers

Tuesday
     Lunch - Macaroni and cheese, carrots and celery with ranch yogurt dip
     Dinner - Beefy Garden Patch Soup, Salad, Homemade Breadsticks

Wednesday
     Lunch - Peanut butter, Nutella, Banana quesadilla, GM Smoothie
     Dinner - Asian Chicken Broccoli Slaw

Thursday
     Lunch - Pizza Sticks, Creamy Cucumber Salad
     Dinner - Southwest Chicken Chile Hoagie Melts, Mexican Chopped Salad

Friday
     Lunch - Homemade Lunchable's, Grapes
     Dinner - Swedish Meatballs, Egg Noodles, Peas and Carrots

So, again...I would love some feedback on my goals/ideas and of course what you have on your menu plan for the week

Wednesday, June 2, 2010

Iced Coffee

I grew up in an itty bitty small town in Colorado.  I always knew I was destined for the "big city".  After all, out of the whopping 32 (?) people that were in my graduating class, 12 of us (the Dirty Dozen) started kindergarten together.  With barely a wave goodbye later, I went to college in the Seattle area and fell in love with it.  One thing Seattle is known for, aside from rain, is coffee.  I became addicted instantly, especially to iced coffee drinks.  On my first trip back home, depression set in when I saw there was not a coffee stand in sight.  I just sat on a hay bale and watched the tumble weeds blow....sigh.  Just kidding.  Well, kinda :)
Eventually, marriage and kids takes over and you find other things to do with your money than spend $5.00 a day on a coffee drink.  $5.00 a day....$35.00 a week....$151-ish a month....$1820 a year.  Yeah, it adds up.  So, I tried doing the "responsible" thing and make them at home.  I would take hot coffee and pour it over ice.  Bleck, it was just a watered down mess.  I would take leftover coffee and put it in the fridge, but it always turned bitter and acidic.  So, imagine the happy dance I jigged when I saw Mommy's Kitchen put a technique on her site that cold brewed coffee into a coffee concentrate, that you simply added milk and flavorings.  YES!  I tried it and immediately fell in LOVE!  Do yourself a favor and start a batch of this tonight and tomorrow you too can sip on a scrumptious, just the way you like it, stickin' it to the man Iced Coffee!


Ingredients:


  • 1-Cup ground coffee - fresh ground is great but not necessary
  • 32 ounces cold water
  • Milk
  • Flavoring - I like using the flavored coffee creamers. Especially the Sweet Cream flavor, but you can experiment and use any of your favorite flavored syrups that you can buy at the grocery store.
Equipment:
  • 1 Glass container with lid to hold at least 32 ounces. You can use a canning jar, or like me, a washed large applesauce jar.
  • 1 smaller glass jar with lid to store coffee concentrate in fridge. I used a washed out spaghetti sauce jar.
  • French Press
        OR
  • Strainer
  • Coffee filters - largest you can find. Not the cone shape, but the bucket/basket shape. I changed filters after straining half of the mixture.

Place coffee grounds in container. Pour 32 ounces (4 cups) cold water over the coffee grounds. Put on the lid and gently swish to get all the grounds wet. Let it sit on the counter overnight, or 12-15 hours. Por coffe mixture into your french press and press this amazing concentrate OR place your strainer over a large bowl, and put a coffee filter inside the strainer. Slowly pour coffee into the filter and allow it to sit until it has drained through. As I said, I changed filters about half way through. Keep straining the coffee mixture through a filter until jar is empty. Pour coffee concentrate in another smaller jar to keep in fridge for further use.

To make the iced coffee, fill a glass with ice and mix equal amounts of coffee concentrate and choice of milk, or water depending how you like it. Add sweeteners or flavorings of choice. I have made it using 1/2 cup coffee concentrate and 1/2 cup chocolate milk making a yummy mocha-ish drink, I have also made it using 1/2 cup coffee concentrate and 1/2 cup rice milk, adding 2 TBSP Italian Sweet Cream creamer. You could even get fancy and blend the coffee concentrate with ice, add some chocolate chips and milk or chocolate milk...Viola! Mocha Frappacino! OR, blend the coffee concentrate with milk, ice, and a couple TBSP caramel sauce...CARAMEL Frappacino! What is great about this is you can totally adjust it to how you like it with flavors or control the amount of sugar and fat with the type of sweeteners and milk product you use.

You can also make 1-cup hot coffee by using the same method and heating it up.