Showing posts with label Comfort Food. Show all posts

Wednesday, May 9, 2012

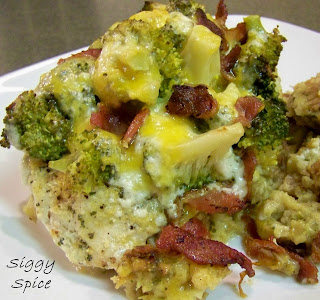
Chicken Bacon Broccoli Ranch Foil Packets

Howdy from Austin!
I have been gone FOR-EVER I know...packing, house hunting, moving, road tripping, hotel-ing.  Technically, I am still not even back...I am battling the mind numbingly slllooowww hotel Internet to write this post.  Our house will not be ready until the 18th, so we have been hotel dwellers.  Oh.  My.  Hell.  I am so sick of hotel breakfasts and restaurant food, BLERG!
I was looking through some recipes I had saved up and saw this, and like Pavlov's pooches, I drooled.  It was so stinkin' good and I could possibly sell my pooch to have some now.

My sweet Bella
Awww, never mind, she's too cute...I miss her....she has been staying with Auntie Jan since we are doing the Urban Camping thing.  Urban Camping...it is when you cram 2 adults and 3 kiddos into a hotel room.  It sounds much more glamorous than it is.  Trust me. 

Anyway, it was scrumptious...seriously, what is not to love about chicken, broccoli, bacon, cheese, ranch, and a handy dandy foil packet?!?!  I highly recommend that you make it immediately, if not sooner!


Chicken Bacon Broccoli Ranch Foil Packets
Recipe Source:  the brilliant Cassie from Cassie Craves
  • 1 package chicken-flavored stuffing mix prepared to package directions
  • 4 boneless skinless chicken breasts
  • 4 cups fresh broccoli florets
  • 1 cup shredded cheddar cheese
  • 4 slices bacon, cooked and crumbled
  • 4 TBSP ranch dressing, yup the stuff out of the bottle
Preheat the oven to 400 degrees. Spray 4 sheets of heavy-duty aluminum foil with cooking spray.
Divide the stuffing mixture onto the center of each foil sheet.
Top stuffing in each packet with a chicken breast half, season with salt and pepper, then add 1 cup of broccoli. Sprinkle with 1/4 cup of the cheese and one slice of bacon, then drizzle with 1 TBSP of ranch dressing. Repeat with all packets.
Bring up foil sides and fold to seal, leaving room for heat circulation inside.
Place packets on a cookie sheet and bake 25 to 30 minutes. Remove packets and let stand 5 minutes. Cut slits in foil for steam before opening.

Friday, March 9, 2012

Boursin Roasted Chicken

FRIDAY!! Hip-hip-hooray!! For some reason, I have been a day ahead all week in my mind. I hate when I am so excited that it is Friday only to look at a calendar and realize it is in fact Thursday. Not to mention this week was the first week back in school for the girlie's since the 3-week-we-were-sick-the-whole-time-trackout. So, needless to say, our sleep schedule hasn't adjusted yet...just in time to change the clocks this weekend.

Anyway...
I made this recipe before the plague descended on our home. It was un-freaking-believable! This recipe is easy enough to make weeknights or fancy-pants enough for guests. If you have never had Boursin cheese, you are missing out! It is a super creamy, herb-y, garlic-y cheese that makes an appearance at our house A LOT. You can buy it most anywhere, but I have found the best prices for it to be at Trader Joe's, Costco, or Sunflower Market. The cheese makes such a luscious coating to the chicken, leaving it super moist and flavorful. Then the sauce that is left on the bottom of the baking dish is to die for. OH, btw, that is not lumpy mashed potatoes you see there, it is lumpy Mashed Cauliflower (doin' the whole low-carb/Paleo-ish thang)...I do not have an immersion blender (gasp) or a food processor (double gasp).
Anyway...
Definitely give this recipe a try...it is amazing!

Boursin Roasted Chicken
Recipe Source: Emeril Lagasse
  • 1 TBSP Extra Virgin Olive Oil
  • 1 (3 1/2 to 4-pound) whole chicken
  • Salt and freshly ground Black Pepper
  • 2 (5.2-ounce) packages Boursin Cheese
Preheat oven to 400 degrees F. Coat the bottom of a roasting pan or shallow casserole dish with the oil.
Rinse the chicken well under cold running water and pat dry with paper towels. Season the chicken well, inside and out, with salt and pepper. Place the chicken in the prepared roasting pan and place 1 whole block of cheese inside the cavity of the chicken. Cut the remaining block of cheese into fourths and pat 1/4 of the cheese spread over the breast portion of the chicken. Allow the remaining 3/4 of the block of cheese to sit out at room temperature while the chicken is roasting.
Place the roasting pan in the center of the oven. After about 10 minutes, once the cheese has softened and begun to melt on the top of the chicken, remove the pan from the oven, and using the back of a spoon, spread the Boursin all over the chicken. Return the pan to the oven and roast for 25 minutes, until the chicken is golden brown on top.
Remove the pan from the oven and turn the chicken over so the back is now facing up. A small amount of cheese will probably begin to ooze out of the chicken cavity at this point, so take a bit of it and spread it all over the back side of the chicken. Return the pan to the oven and roast until the back side of the chicken is golden brown, about 25 minutes.
Remove the pan from the oven one more time. Reduce the oven temperature to 375 degrees F and turn the chicken over again, so the breast is once again facing up. Continue to cook until the chicken is done, 20 to 30 more minutes. Test for doneness by inserting a knife at one thigh joint and making sure that the juices run clear.
Remove the chicken from the oven and transfer to a platter or cutting board. Set aside, loosely covered with aluminum foil. Carefully remove and discard as much rendered fat from the roasting pan as possible. Add 1/2 cup hot water and the remaining cheese to the roasting pan. Remove any remaining melted cheese from the cavity of the chicken and add to the roasting pan.
Carve the chicken into serving pieces, allowing the juices from the chicken to run onto the platter. Add the juices to the roasting pan and mix well with the Boursin, drippings, and water. Serve the sauce spooned over the carved chicken.
ENJOY!

This recipe has been linked at:
Tidy Mom
Simply Sweet Home
The Country Cook
Jennifer Cooks

Wednesday, January 4, 2012

Roasted Red Potato and Green Bean Beef Soup

Happy 2012!  I trust you all had a wonderful New Year celebration.  As for us, we had a total chill-out, X-Box for the hubs, DS for the kiddos, Nook for me, type of night.  In fact, I was lost in the world of the Hunger Games....reading the entire series that weekend.  It is a great series in case you are of the few (like me) who hadn't read it yet.
I have a super yummy recipe today that I CANNOT wait to make again.  In fact, it got gobbled up so quickly that we didn't even have leftovers!  Now, while we do not eat Hamburger Helper....it is the base of this soup, which scared me at first, but it totally works.  I have not tried the recipe NOT using it, so I can't help you out if you are dead set against using it...sorry :(  But, if you are looking for a really tasty, kid and man pleasing, super easy, comfort food-type dish, give this one a try!

Roasted Red Potato and Green Bean Beef Soup
Recipe Source:  Moogie and Pap
  • 1 pound ground beef
  • 1/2 cup onion, chopped
  • 1 package Hamburger Helper Beef Pasta
  • 5 cups water
  • 1 bay leaf
  • 1/4 teaspoon salt
  • 1/8 teaspoon pepper
  • 1 (16 ounce) can stewed tomatoes  (I pureed a bit since I am not big on chunky tomatoes)
  • 1 package frozen Birds Eye Roasted Red Potatoes and Green Beans

Cook and stir ground beef and onion in a Dutch oven until beef is brown; drain. Stir in sauce mix from Hamburger Helper package. Add water, bay leaf, salt, pepper and tomatoes. Heat to boiling, stirring constantly. Reduce heat; cover and simmer, stirring occasionally for 10 minutes. Stir in vegetables and noodles; cover and cook about 10 minutes longer. Serves 5 to 6.

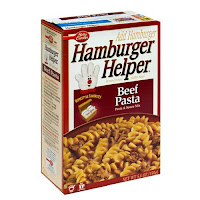
In case you need a visual on the packaged ingredients, here you go!
Photo courtesy of Birds Eye
photo courtesy of Betty Crocker

This recipe has been linked up at:
Simply Sweet Home
Tidy Mom
The Country Cook
This Chick Cooks

Friday, December 9, 2011

Scooter's Baked Spaghetti

We are back from Texas.....WHEW, what a trip!  I think I deserve an award or something for going on a 3-day-each-way road trip by myself with 3 kiddos.  Or maybe a weekend spa getaway.  Or maybe a week-long nap.  Or maybe some of my favorite Sara Bee wine administered by intravenous drip.
We had a great time and the road trip was actually a breeze.  The kiddos were GREAT and there were no problems.  The only meltdowns/temper-tantrums were from me, lol!
During this time of the year, I firmly believe it is of the utmost importance to keep some sense of normalcy.  It is too easy to get swept up in the craziness.  For me, keeping up with family dinners is vital.  Not only does it ground you and remind you of what is really important, but it nourishes your body and soul for this stress-laden season.
This recipe has turned into a family favorite for sure.  The unique combination of ingredients gives is an almost lasagna-type quality.  Ohhh, the French Fried Onions really bump it up a notch and give such a great flavor and texture.  It is a cinch to make and would be a great dish to put together in the morning (sans French Fried Onions) and simply bake when you are ready.  We all really, really loved it!

Scooter's Baked Spaghetti
Recipe adapted from: Salad in a Jar
  • 8 ounces uncooked spaghetti
  • 1 pound ground beef
  • 1 jar of your favorite spaghetti sauce (26.5 ounces)    
  • 1 TBSP butter
  • 1 TBSP Extra Virgin Olive Oil
  • 1/2 cup chopped green peppers
  • 1/3 cup chopped onions
  • 1 clove garlic, minced 
  • 8 ounces cream cheese, softened
  • 2 TBSP milk
  • 2 cups shredded Mozzarella cheese, divided
  • 2/3 cup grated Parmesan cheese, divided 
  • French Fried Onions (small can)
Cook spaghetti according to directions on the package. Cook to al dente, drain and set aside.
In a bowl, combine cream cheese and milk.  If your cream cheese is not soft enough, you can stick it in the microwave for a few seconds.  It should be able to spread easily.  Set aside.
In a skillet, saute the onions and peppers until translucent.  Add garlic and cook until fragrant, but do not let it burn.  Combine vegetables to cream cheese mixture.  Add 1 cup of Mozzarella Cheese and 1/3 cup grated Parmesan Cheese to the cream cheese/veggie mixture and stir to incorporate.
In same skillet (less dishes) brown ground beef. Drain excess grease. Add spaghetti sauce to skillet and heat.

Using a 10 x 6 dish (I used a 9x13 and was ok), assemble in the following order:
Thin layer of spaghetti sauce on the bottom of the casserole dish.
Spaghetti Noodles
Cream cheese/vegetable/cheese mixture
Spaghetti Meat sauce
Remaining cup of Mozzarella Cheese and remaining 1/3 cup Parmesan Cheese (or more taste of course)
French Fried Onions (added during last 5 minutes of cooking)

Bake at 350 degrees for 25 minutes. Top with French Fried onion and continue baking 5 more minutes. (This is the secret ingredient–don’t let them burn.)

Note:
Make this ahead of time and refrigerate or freeze without the French Fried onions. Don’t forget to add them 5 minutes before casserole is finished cooking.

This recipe has been linked up to:
The Counrty Cook
Tidy Mom
Simply Sweet Home
This Chick Cooks

Monday, November 14, 2011

Better Than Olive Garden's Zuppa Toscana

I am this close to a trifecta my friends!  I present to you "Better Than Olive Garden's Zuppa Toscana".  The name pretty much says it all...it IS better than the Zuppa Toscana soup at Olive Garden.  I am working on finding a fabulous salad dressing for the "Better Than Olive Garden's Salad".  I already have the breadsticks that I think are way better than Olive Garden's, found HERE.  Don't wait to make this one, it is SCRUMPTIOUS!

Better Than Olive Garden's Zuppa Toscana
Recipe Source:  Steak N Potatoes Kinda Gurl
  • 4 slices bacon, diced
  • 1 lb ground hot Italian sausage
  • 1 large yellow onion, diced
  • 4 cloves garlic, minced
  • 4 cups (32 oz) chicken stock
  • 3 cups russet potatoes, cubed
  • 3/4 tsp sea salt
  • 1/4 tsp freshly ground black pepper
  • 2 cups kale, washed and cut into bite size pieces
  • 1 cup heavy whipping cream
  • Parmesan cheese, grated, to taste
In a large pot, cook the bacon until crispy. Drain the grease. Add the sausage, breaking it apart as it cooks. Once sausage is browned and crumbled, remove sausage and drain off grease leaving a tbsp to saute the onion.
Add the onion to the pan; saute until translucent; add garlic; saute until fragrant.  Add the bacon and sausage back into the pot.
Stir in the stock and potatoes, season with salt and pepper, and simmer for about 20 minutes or until potatoes are tender.
Add kale and heavy whipping cream. Bring to a simmer. Top with Parmesan cheese, when serving.

This recipe has been linked up to:
This Chick Cooks
The Country Cook
Tidy Mom
SImply Sweet Home
Eat at Home

Thursday, October 20, 2011

Caramel Apple Crisp Pizza

The NC State Farmer's Market is busting at the seams with apples, apples, apples.  It is just such a  fall sight for my sick-of-summer eyes.  In that spirit, here is a very fall recipe for you!  It is super scrumptious and really a snap to put together....my kind of dessert.  It is perfect topped off with some vanilla ice cream, you know, to lighten it up a bit, lol! 

Caramel Apple Crisp Pizza
Recipe adapted from:  Life as a Lofthouse
  • Pastry for single-crust pie ( 9 inches )
  • 1/2 cup Sugar
  • 3 TBSP All-Purpose Flour
  • 1 tsp ground Cinnamon
  • 3 Large apples, peeled and diced into 1/4 inch pieces.  I like to use 1 Granny Smith and 2 Braeburn.  Definitely make sure you use at least 1 Granny Smith...the tartness pairs so well with the sweet.  Also, the combos of textures and taste keep it interesting!
TOPPING:
  • 1/2 cup All-Purpose Flour
  • 1/3 cup packed Brown Sugar
  • 1/3 cup Rolled Oats
  • 1 tsp ground Cinnamon
  • 1/4 cup Butter, softened
  • Caramel topping...of course, if you can, use Trader Joe's Fleur de Sel Caramel Sauce

Lay out the pie crust on a pizza pan or cookie sheet.  Roll out slightly; fold under or flute the edges. Combine sugar, flour and cinnamon in a medium bowl. Add peeled, diced apples and toss. Arrange the apples in a single layer over the pie crust to completely cover it.
Combine the topping ingredients in a bowl and then sprinkle evenly over the apples.
Bake at 350 degrees for 35-40 minutes or until apples are tender. Remove from oven, cut into slices, and serve with a drizzle with caramel.

This recipe has been linked up at:
Tidy Mom
Simply Sweet Home
This Chick Cooks

Wednesday, October 12, 2011

Outback Steakhouse Alice Springs Chicken....a copycat recipe

It seems the older I get, the more unimpressed I get with restaurant food.  The concept is good, but somehow the execution just isn't there.  More often than not, I end up leaving a restaurant thinking "I could have made that".  So, it should come as no surprise that I love copycat recipes.  Can I just say, this was one tasty chicken dish!  I mean come on, what is not to love...chicken in a delightful honey mustard marinade that makes it insanely juicy, sauteed mushrooms, bacon, cheese?!?!  Also, as impressive as the dish seems, it is surprisingly easy to put together. 

Outback Steakhouse Alice Springs Chicken
Recipe Slightly Adapted From:  A Treasury of Top Secret Recipes by Todd Wilbur
  • 4 Skinless, Boneless Chicken Breasts
  • 3 TBSP Extra Virgin Olive Oil, divided
  • 2 cups sliced mushrooms (10-12)
  • 2 TBSP Butter
  • 1 clove garlic
  • salt and pepper to taste
  • 8 slices bacon, cooked
  • 1 cup shredded Cheddar Cheese
  • 1 cup shredded Monterey Jack Cheese
For the Honey Mustard Marinade
  • 1/2 cup Dijon Mustard
  • 1/2 cup Honey
  • 1 1/2 tsp vegetable oil
  • 1/2 tsp lemon juice
Whisk together the Honey Mustard Marinade ingredients either by hand, hand mixer, or blender until well combined.
Place defrosted Chicken Breasts into a gallon-sized Ziploc bag and pour 2/3 of the marinade over top, making sure all the chicken gets covered by sauce.  Place remaining 1/3 Honey Mustard Marinade in the refrigerator.  Once it is nearing the end of the marinating time, cook your bacon and set aside.
Preheat oven to 375 degrees. 
In a skillet over medium heat, heat up 2 TBSP of the Olive Oil.  Sear the chicken 3-4 minutes per side and remove to a baking dish. DISCARD Ziploc bag with marinade!
While the chicken is searing, heat Butter and reserved Olive Oil in a saute pan.  Add sliced mushrooms and allow to saute until soft and brown.  Near the end of the saute time, add Garlic Clove and cook until fragrant.
Once in the baking dish, brush each chicken breast with some of the reserved Honey Mustard Sauce, saving any leftover for serving if desired.  Stack 2 slices of bacon on each chicken breast, creating an "X".  Spoon the mushroom mixture onto the bacon, making sure to coat each breast evenly.  Spread 1/4 cup Monterey Jack Cheese and 1/4 cup Cheddar Cheese on top of the mushrooms. 
Bake the chicken for 8-10 minutes.
ENJOY!!!

This recipe has been linked up at:
Tidy Mom
Simply Sweet Home
This Chick Cooks
Eat at Home

Monday, October 3, 2011

Chili Verde (Mexican Stewed Pork)

You all know how I feel about the Mexican food here in North Carolina.  It is simply horrendous.  Stuffing a Poblano Pepper with hamburger and Velveeta does not a Chili Relleno make.   There were so may choices for a true, authentic Chili Relleno smothered with ridiculously SCRUMPTIOUS pork green chili when we lived in Colorado....Hacienda Colorado, Los Dos Patrillos, Brewery Bar, just to name my favorites.  So, what's a girl to do??  Experiment and try a billion recipes until she comes up with a winner.  As far as pork green chili goes, this is a winner.  It is much thicker and much more meaty than the smothering kind, but OH SO FLAVORFUL!  We enjoyed this stuffed in flour tortillas and topped with cheese, sour cream, and lettuce.  My daughter (who comes by her obsession with Chili Rellenos honestly) made a cheese and green chili quesadilla and used it almost as a scoop.  Brilliant I tell ya! 
However you choose to eat it, just eat it.  It is spectacular!

Chili Verde, aka Mexican Stewed Pork
Recipe slightly adapted from:  Mel's Kitchen Cafe
  • 2 TBSP vegetable or canola oil
  • 5 pounds boneless pork roast, or boneless country ribs, trimmed of as much fat as possible
  • Salt and pepper for seasoning roast.  I used salt and Montreal Steak Seasoning.
  • 2 yellow onions, chopped
  • 5 cloves garlic, finely minced or crushed
  • 1 (15 oz.) can green enchilada sauce
  • 3 (4 oz.) cans diced green chilies
  • 3 (14 oz.) cans diced tomatoes with green chilies
  • 1 beef bouillon cube (or 1 teaspoon beef bouillon granules)
  • 1 tsp ground cumin
  • 1 tsp dried oregano
  • ½ teaspoon black pepper
Cut the roast into 3-4 large chunks. Season the pork generously with salt and pepper on all sides. In a large heavy pot, the oil over medium heat until the oil is shimmering and hot. Add the pork, being careful not to crowd the pot (brown the pork in shifts, if needed). Brown the pork on all sides until golden and well-browned, about 30 seconds to a minute on each side. Leave the roast in the pot and add the onion and garlic. Cook for 1-2 minutes, stirring often. Place the pork and garlic and onions in the slow cooker. Stir in the rest of the ingredients to the slow cooker. Cover and cook on low for 8-9 hours. After the roast has cooked for the allotted time, remove the roast. Shred it into bite-size pieces and set aside, covered with foil to keep warm. Pour the remaining liquid and ingredients from the slow cooker into a large saucepan. Bring the mixture to a boil on the stove, and simmer vigorously over medium-low or medium heat for 20-30 minutes, stirring often to prevent sticking or burning, until the mixture considerably reduced and thickened. DON'T SKIP THIS STEP!!!  Reducing the sauce is essential in deepening the flavor of the sauce.  Add the pork roast and sauce back to the slow cooker. Stir to coat the pork with the sauce. Turn the crockpot to low or high and allow the pork to heat through again. Serve with warm tortillas and desired toppings, such as sour cream, cheese, avocados, lettuce, tomatoes.

This recipe has been linked up at:
This Chick Cooks
Simply Sweet Home
Tidy Mom
The Country Cook
.

Tuesday, August 30, 2011

Chicken Pillows

Keeping it short and sweet today.
These fancy-shmancy looking little numbers are as easy as they are scrumptious.  The filling is so adaptable, my mind has been racing since I originally made them of all the wonderful tweaking I could do!

Chicken Pillows
Recipe Source:  Another spectacular one from Holly at Life as a Lofthouse
  • 2 cups Chicken, cooked and shredded
  • 4 ounces Cream Cheese, softened
  • 1 TBSP Butter, softened
  • 1/2 TBSP dried Chives
  • 1/2 TBSP dried, minced Onion
  • Salt and Pepper, to taste
  • 1- (8 oz) can Pillsbury Crescent Roll dough
  • 1/4 cup Butter, melted
  • 1 cup Italian Breadcrumbs
GRAVY:
  • 1 can Cream of Chicken soup
  • 1 packet Chicken Gravy mix
  • 3/4 cup Water

Preheat oven to 350 degrees. Lightly grease a cookie sheet with cooking spray and set aside.
Mix together the softened cream cheese and 1 tablespoon butter. Add in chicken, chives, onion and season with salt and pepper.
Unroll your crescent dough and press together two triangles to create one rectangle. Make sure you press together the perforations well so your filling wont ooze out. You should have 4 rectangles total.
Spoon about 3 tablespoons of chicken mixture into the center of rectangle. Fold each corner over the center of filling. Press together to cover filling entirely. Shape into a ball. Repeat with all rectangles. Once all pillows are formed, dip each into the melted butter, and then coat in breadcrumbs. Shake off excess. Place each coated chicken pillow onto the greased cookie sheet.
Bake for 20-25 minutes or until golden brown.
While chicken pillows are baking, make the chicken gravy. In a small saucepan, mix together the cream of chicken soup, gravy packet and water. Bring to a boil, and then reduce heat to low and let simmer and thicken until ready to use.
Pour gravy over each chicken pillow, serve, and ENJOY!


This recipe has been linked up at:
Eat at Home
This Chick Cooks
Tidy Mom
Simply Sweet Home


Thursday, August 25, 2011

Cube Steak Casserole

As we are preparing for our first hurricane experience which may or may not effect us, I have been drawn to comfy, homey dishes.  The kind of dish that is like a big-ol-hug from your Grandma.You know, staring down an angry category 4 hurricane, pushing it out to sea with your mid powers can sure take it out of you. 
This dish was a perfect choice, but careful, this is one FUGLY dish. 
Fugly, but YUM-I-LICIOUS!
This is one of those dishes that I wished for a scratch and sniff feature for my blog.
The highly affordable cube steak cooks until fork tender with creamy, beefy, mushroom-y rice on top.
The only change I will make next time is to cut the cube steaks into smaller steaks.  I had some gargantuan pieces that I ended up having to split because they were just too big, so I think cutting them into palm sized steaks will help with serving.

Cube Steak Casserole
Recipe Adapted From:  The Serendipity Bistro
  • 4-6 Cube Steaks
  • 1 packet dry Onion Soup mix
  • 1 can Cream of Mushroom soup
  • 1 1/2 cans water (soup can, obviously)
  • 1 (4 ounce) can mushrooms, drained and chopped small
  • 1 cup Minute rice (brown or white)
  • flour seasoned to taste.  I used salt, pepper, garlic powder, and onion powder
Preheat oven to 350 degrees.
Dredge cube steaks in seasoned flour. Brown cube steaks on both sides in a skillet of hot oil. Transfer cube steaks to a 9x13 baking dish. Mix Cream of Mushroom Soup, Onion Soup, Mushrooms, and water together. Pour over cube steaks. Sprinkle rice over all (aiming most to be in the liquid portion). Cover with foil & bake at 350 degrees for 1 hour.

Recipe linked up at:
Tidy Mom
Simply Sweet Home
This Chick Cooks

Wednesday, August 10, 2011

3 Envelope Crockpot Chicken


I took the kidlets to go see the Smufs this weekend, or as my 4-year old likes to call them, the Smurps.   It has inspired a song...

"La, la, la, la, la, la it's so Smurfing hot...
La, la, la, la, la, la how can you Smurf the whole day long?
Sooo, la, la, la, la, la, la Smurf this Smurfing song!"

Sorry, the heat has left me a wee-bit-cranky and drained my song-writing mojo.
Moving on...

I tend to pick my meals lately based on how little heat it will create in the house which is why we spend most of the summer eating salads, grilled foods, and Crockpot meals. The recipe I am sharing today creates a flavorful, juicy piece of chicken cooked in a fantastic gravy....and did I mention it is silly simple?! You can throw this bad-boy in the Crockpot, go to the pool for the afternoon, and come home to a house that smells slap-your-sunburn GOOD!

3 Envelope Chicken
Recipe Source: Fantastical Sharing of Recipes
  • 1 packet Ranch Salad Dressing mix
  • 1 packet Italian Salad Dressing mix
  • 1 packet chicken gravy mix
  • 1 cup of water
  • 4-6 boneless skinless chicken breasts
Place thawed chicken breasts in a cold Crockpot.
Combine the Ranch Dressing Mix, Italian Dressing Mix, and Chicken gravy mix with 1 cup of cold water. Stir to combine. Pour over chicken and cook on low for 4-6 hours or on high for 2-4 hours. Make sure and cook up some mashed 'taters, egg noodles, or rice to pour some of that fabulous sauce on!

This recipe was linked up at:
This Chick Cooks
Tidy Mom
Simply Sweet Home


Monday, July 25, 2011

Root Beer BBQ Pulled Pork Sliders

This isn't a new recipe...it has been around forever.  So, why has it taken me so long to try it?  Who knows...maybe it was the thought of using root beer.  However, it is the root beer that takes this BBQ Pork to a new level-o-yum!  For these IN-sanely hot days, this is a perfect crock-pot meal.  As a total bonus, it is silly simple as well as scrumptious. 
OK, going to go sit under the AC vent....keep cool everyone!

Root Beer BBQ Pulled Pork Sliders
  • 3-4 lbs pork butt/shoulder. 
  • 2 TBSP Montreal Steak Seasoning 
  • 1 bottle (12 ounces) your favorite root beer.  Again, DO NOT USE DIET!!!  Seriously, seriously scary stuff happens when you heat all those crazy chemical sweeteners
  • 1 bottle of your favorite BBQ sauce.  My favorite is Bullseye Original.  I just saw a big taste test thing for BBQ sauces and Bullseye Original took first place ;)  Yup, I know how to pick a winner, lol!
  • Hawaiian Sweet Rolls for serving
Sprinkle Montreal Steak Seasoning over you pork roast.  Place in cold crock pot.  Add bottled root beer to crock pot, pouring around the roast to not disturb the seasoning.  Cook on low for 8 hours, or until it shreds easily.  Remove meat from crock pot and shred into desired sized pieces.  Drain and reserve liquid.  Add meat back into crock pot and add just enough reserved liquid to re-moisten meat, about 1/4 cup.  Add enough BBQ sauce to give meat a nice coating.  Let sit in crock pot on low until warm.  Serve on Hawaiian Sweet Rolls.

This recipe has been linked up at:
This Chick Cooks
Tidy Mom
Simply Sweet Home

Tuesday, July 19, 2011

Okinawan Takoraisu, aka Taco Rice

Today, you not only get an amazing recipe, but a little of the food-history behind it. 
In the 1960's, a Japanese chef took the love of American Tacos, popular with the US military stationed there, and gave it an Asian flair.  A hybrid if you will.  A wee splice.  A tweak.  Interestingly enough, it has now become one of the most well-known Okinawan dishes.  So, cliff-notes version:  taco flavors + Asian flair = major YUM enjoyed by all!
Everyone loved this dish, adults and kidlets.  There was something so subtle and special about the soy sauce in the taco meat...and then serving it over rice made it so cozy and scrumptious.  PLUS you get this amazing hot/cold thing that is amazing. 
お楽しみ !

Okinawan Takoraisu, aka Taco Rice
Recipe source:  La Fuji Mama
  • 1 TBSP vegetable oil
  • 3 cloves garlic, minced
  • 1 cup onion, diced
  • 1 pound ground beef - use a leaner mix.
  • 3 TBSP Soy Sauce - I used low sodium
  • 1 TBSP Chili Powder
  • 1 tsp ground Cumin
  • 1 tsp salt
  • 1 tsp freshly ground Black Pepper
  • 4 cups steamed rice
  • 2 cups lettuce, shredded
  • 2 cups tomatoes, diced
  • 12 ounces Queso Blanco, crumbled OR 2 Cups Shredded Mozzarella Cheese
  • 1 cup your favorite salsa
  • 4 TBSP Sour Cream
Heat the vegetable oil in a saute pan over medium heat. Add the garlic and onion and saute until the onions are barely soft. Add the ground beef and break it into small chunks. Once the meat is cooked, add the soy sauce, chili powder, cumin, salt, and pepper. Let this simmer until the liquid reduces.
Spread 1/2 to 1 cup of the steamed rice on each plate. Top with the seasoned beef.
Then top with the shredded lettuce, tomatoes, cheese, and salsa, and finish it off with a dollop of sour cream.

This recipe has been linked up at:
This Chick Cooks
Simply Sweet Home
Tidy Mom

Monday, June 6, 2011

Sticky Chicken Finger Wraps

THESE are one of my latest obsessions.  Obsession as in, we have had them several, SEVERAL times since my blogging-buddy and friend Holly from Life as a Lofthouse first posted about them.  Don't you just love Holly and all of her amazing eats?!  She definitely speaks my food language.  You already know how I feel about her Strawberry Chicken Salad!
These one of those things that I want each and every one of you to try, because it is that good.  If you hesitate, I want to show up at your door with a plate of them and force feed you...kidding....or am I?!
Slap yourself silly-simple to put together and versatile as well.  We have enjoyed them as a wrap/taco meal, we have enjoyed them without any toppings or wraps with a side of mac and cheese, and we have enjoyed them on top of a salad.  However you like it, they completely have rocked my little-ol-world!

Sticky Chicken Finger Wraps
Recipe Course:  Life as a Lofthouse
  • 6 tablespoons Franks Original Hot Sauce.  It has to be Franks.  On another note, please don't worry about this being too spicy.  It isn't.  My kiddos were able to eat it, yet it had enough kick for the adults.  I highly suggest you try it as written before you make any adjustments.
  • 3/4 cup Brown Sugar
  • 4  TBSP water
  • 8  fully cooked Breaded Chicken Fingers.  You can get these from your grocery store deli, or buy them frozen.  If using frozen, just make sure to bake them up before you start.  I like the frozen Chicken Strips you buy at Trader Joe's and the one's at Costco.
  • 4 Flour Tortillas, burrito size.  I used Whole Wheat. 
TOPPINGS
  • Shredded Cheese.  I use a Cheddar/Monterey Jack blend 
  • Chopped Tomatoes
  • Shredded lettuce
  • Ranch Salad Dressing 

In a medium saucepan heat the hot sauce, brown sugar and water over medium heat until sugar is dissolved and sauce is heated thoroughly. About 5 minutes.
Place cooked chicken fingers in a large Tupperware. Pour in the sauce. Seal shut with the lid and shake to coat all chicken fingers with the sauce.
Place one to two sauce-coated chicken fingers onto the tortilla. Add desired amount of cheese, lettuce and tomato.  Drizzle a little bit of ranch on top, and Viola!  Perfection!

This recipe has been linked at:
Tidy Mom
Simply Sweet Home
This Chick Cooks
Eat at Home

Friday, May 20, 2011

Vanilla Pudding Chocolate Chip Cookies

Again, I am a wee-bit behind the ball on this one.  But I figure that if I was late trying them, even though they have been EVERYWHERE on the blog-o-sphere, there might be a few of you who have yet to try them as well.  Can I just say....
These.
Are.
AWESOME!
It took me a really long time to find a chocolate chip cookie recipe I liked.  Turned out that, my favorite recipe was the Nestle Chocolate Chip Cookie recipe on the back of the bag, except halving the butter and using Ghiradelli Milk Chocolate Chips.  The result is a soft, thick, and chewy cookie. 
So, when I saw that the Vanilla Pudding Chocolate Chip Cookies were basically the Nestle recipe except swapping some of the sugar for a box of instant vanilla pudding, I wondered if I could halve the butter for that recipe too.  Guess what, it worked!  The result was an over-the-top soft, thick, chewy, AMAZING tasting cookie.  And since it is half the butter normally called for, you can eat twice as many right?!  Good thing because...
These.
Are.
AWESOME!

Vanilla Pudding Chocolate Chip Cookies
  • 2 1/4 cups all-purpose flour
  • 1 tsp baking soda
  • 1/2 tsp salt
  • 1/2 cup (1 stick) butter, softened
  • 1/4 cup granulated white sugar
  • 3/4 cup packed brown sugar
  • 1 box (3.4 oz) Instant Vanilla Pudding
  • 1 tsp vanilla extract
  • 2 large eggs
  • 2 cups Chocolate Chips.  Again, I LOVE the Ghiradelli Milk Chocolate Chips

1. Preheat the oven to 375 degrees.
2. In a small bowl, combine the flour, baking soda, and salt. In a separate large mixer bowl, beat together the butter, granulated sugar, brown sugar, and vanilla extract until the dough is creamy. Add in the pudding mix.  Add the eggs, one at a time, beating the dough well after each addition. Gradually beat in the flour mixture. Stir in the chocolate chips. Scoop out rounded tablespoons of dough and place 2 inches apart on ungreased baking sheets.
3. Bake for 8 to 10 minutes, or until golden brown. Cool on the baking sheets for 2 minutes and then remove the cookies to wire racks to cool completely.

This recipe has been linked up at:
Mommy's Kitchen

Wednesday, May 11, 2011

Mexican Lasagna


Talk about a yum-i-licious, ultra gooey dish-o-delish!
I find lasagna it to be one of the upmost comfot foods whether it be a meat and marinara sauce type, vegetarian, or this one like this.  It feeds a crowd and can be made ahead of time to keep your evenings easier.  L. O. V. E. love it!

Mexican Lasagna
Recipe Source:  The ever-fabulous Melanie from Mel's Kitchen Cafe
  • 1 1/2 pounds lean ground beef or turkey
  • 1 yellow onion, coarsely chopped
  • 2 garlic cloves, finely minced
  • 1 (6 ounce) can tomato paste
  • 1 TBSP chili powder
  • 2 tsp ground cumin
  • dash of ground cayenne pepper
  • 1 tsp dried oregano
  • 1/2 tsp salt
  • 1/2 tsp pepper
  • 3 (8 ounce) cans tomato sauce
  • 1 (14.5 ounce) can diced tomatoes, drained
  • 1 (15 ounce) can black beans, rinsed and drained
  • 1 ½ cup frozen corn kernels, white or yellow
  • 1 (6 ounce) can olives, chopped ***I omitted because olives make me want to hurl****
  • 9-12 no-boil lasagna noodles (I love the Barilla brand), or boil and drain regular lasagna noodles
  • 2 cups shredded mozzarella cheese
  • 1 cup shredded cheddar cheese
  • 1 cup sour cream, light or regular
  • 8 ounces cream cheese, light or regular
Preheat the oven to 350 degrees. Lightly grease a 9X13-inch pan and set aside.
In a large 12-inch skillet, brown the ground beef or turkey and onion over medium heat until the meat is no longer pink. Drain the grease. Add the minced garlic and tomato paste. Stir to combine well and cook for about a minute. Stir in the chili powder, cumin, cayenne, oregano and salt and pepper. Mix well. Add the diced tomatoes and tomato sauce. Stir to combine. Add the black beans, corn and olives. Mix well and heat through, about 5 minutes.
Remove the skillet from the heat. Spread 1/2 cup sauce in the bottom of the prepared pan. Layer three (or four, depending on the brand of noodles you use) noodles over the sauce. Spread 1/3 of the sauce over the noodles. Dollop 1/3 of the sour cream and 1/3 of the cream cheese (just pinch off chunks and toss them on top) across the sauce. Sprinkle with 1/3 of the cheeses. Repeat the layers two more times until all the ingredients are used.
Cover the lasagna with foil and bake at 350 degrees for 35 minutes. Uncover and bake 10-15 minutes more, until the lasagna is hot and bubbly. Let stand 10 minutes before cutting into and serving.

This recipe has been linked up at:
Tidy Mom
Simply Sweet Home
Mommys Kitchen

Tuesday, April 26, 2011

The Queen's Banana Pudding

...and by the Queen, I am talking the Queen of southern cooking, Paula Deen.  This dish does look somewhat royal to me with the use of the Chessman Cookies.  It could be a yum-i-licious treat to celebrate a certain royal wedding coming up.  OK, that is a stretch.  Banana Pudding has NOTHING to do with royal weddings.  Great...now I have the image of the Queen in her hat, suit, and gloves trying to wrangle a silver spoonful of this southern staple into her mouth with the royal Corgi's gazing longingly for a bite.
OK, I need to move along...this post is getting really weird.
This is the most AMAZING Banana Pudding!  Truly decadent and scrumptious, it is a breeze to put together and a delight to eat!

Not Yo' Mama's Banana Pudding
Recipe Source:  Paula Deen
  • 2 bags Pepperidge Farm Chessmen cookies
  • 6 to 8 bananas, sliced
  • 2 cups milk
  • 1 (5-ounce) box instant French vanilla pudding (I used regular Vanilla)
  • 1 (8-ounce) package cream cheese, softened
  • 1 (14-ounce) can sweetened condensed milk
  • 1 (12-ounce) container frozen whipped topping thawed, or equal amount sweetened whipped cream
Line the bottom of a 13x9x2-inch dish with 1 bag of cookies and layer bananas on top.

In a bowl, combine the milk and pudding mix and blend well using a handheld electric mixer. Using another bowl, combine the cream cheese and condensed milk together and mix until smooth. Fold the whipped topping into the cream cheese mixture. Add the cream cheese mixture to the pudding mixture and stir until well blended. Pour the mixture over the cookies and bananas and cover with the remaining cookies. Refrigerate until ready to serve

This recipe has been linked up at:
Tidy Mom
Simply Sweet Home
Mommy's Kitchen

Wednesday, April 20, 2011

P.W. Cinnamon Rolls


For those of you who have made Pioneer Woman's Cinnamon Rolls, this is not a new recipe to you.
However, if you haven't, they are seriously CRAZY good.  The dough is a wonderful tender sweet dough but the coffee maple icing is what really takes it over the top.
If you happen to be someone who grew up in the 'Burg with me, one bite of these and you will be transported back to the Winnie the Pooh cafeteria and buying homemade cinnamon twists on Wednesdays.

P.W. Cinnamon Rolls
Recipe Source:  Pioneer Woman
  • 1 quart Whole Milk
  • 1 cup Vegetable Oil
  • 1 cup Sugar
  • 2 packages Active Dry Yeast, 0.25 Ounce Packets
  • 8 cups (Plus 1 Cup Extra, Separated) All-purpose Flour
  • 1 teaspoon (heaping) Baking Powder
  • 1 teaspoon (scant) Baking Soda
  • 1 Tablespoon (heaping) Salt
  • Plenty Of Melted Butter (1-2 cups, divided)
  • 2 cups Sugar
  • Generous Sprinkling Of Cinnamon
MAPLE FROSTING:
  • 1 bag Powdered Sugar
  • 2 teaspoons Maple Flavoring
  • ½ cups Milk
  • ¼ cups Melted Butter
  • ¼ cups Brewed Coffee
  • ⅛ teaspoons Salt
Mix the milk, vegetable oil and sugar in a pan. Scald the mixture (heat until just before the boiling point). Turn off heat and leave to cool 45 minutes to 1 hour. When the mixture is lukewarm to warm, but NOT hot, sprinkle in both packages of Active Dry Yeast. Let this sit for a minute. Then add 8 cups of all-purpose flour. Stir mixture together. Cover and let rise for at least an hour.
After rising for at least an hour, add 1 more cup of flour, the baking powder, baking soda and salt. Stir mixture together. (At this point, you could cover the dough and put it in the fridge until you need it – overnight or even a day or two, if necessary. Just keep your eye on it and if it starts to overflow out of the pan, just punch it down).
When ready to prepare rolls: Sprinkle rolling surface generously with flour. Take half the dough and form a rough rectangle. Then roll the dough thin, maintaining a general rectangular shape. Drizzle 1/2 to 1 cup melted butter over the dough. Now sprinkle 1 cup of sugar over the butter followed by a generous sprinkling of cinnamon.
Now, starting at the opposite end, begin rolling the dough in a neat line toward you. Keep the roll relatively tight as you go. Next, pinch the seam of the roll to seal it.
Spread 1 tablespoon of melted butter in a seven inch round foil cake or pie pan. Then begin cutting the rolls approximately ¾ to 1 inch thick and laying them in the buttered pans.
Repeat this process with the other half of the dough. Let the rolls rise for 20 to 30 minutes, then bake at 400 degrees (see note below) until light golden brown, about 15 to 18 minutes.
For the frosting, mix together all ingredients listed and stir well until smooth. It should be thick but pourable. Taste and adjust as needed. Generously drizzle over the warm rolls. Go crazy and don’t skimp on the frosting.

This recipe has been linked up at:
Tidy Mom
Simply Sweet Home
Mommy's Kitchen

Monday, April 4, 2011

Poor Man's Stroganoff

My husband's favorite dish that he grew up with is his Mom's Beef Stroganoff. 
In my opinion, you should just never try to re-make your husband's favorite dish from his Momma or Grand-mama.  No matter how scrumptious yours may be, you can never over-come that emotional attachment or memory.  So, I have never even ventured into any kind of "anoff".  However, when I saw Mel's recipe for this Poor Man's Stroganoff, even though it was a stroganoff, it was different enough not to matter.  Plus, it had bacon in it.  I mean, come on....bacon and a creamy sauce, I am sold!
This was such comfort food...nothing fancy, just fantastic simple flavors that do the dance well.   Delish!!!

Poor Man's Stroganoff
Recipe Source:  Mel's Kitchen Cafe
  • 1-2 tsp olive oil
  • 6 oz turkey bacon, diced (I used center cut, though I think a good peppered bacon would be AMAZING)
  • 8 ounces sliced mushrooms
  • 1/4 tsp salt
  • 1 ½ pounds lean ground beef or ground turkey
  • 1 medium red or yellow onion, chopped
  • 2 cloves garlic, finely minced
  • 1/2 tsp salt
  • 1/2 tsp pepper
  • ¼ cup flour
  • 2 TBSP tomato paste
  • 1 cup low-sodium beef broth
  • 1 TBSP Worcestershire Sauce
  • ½ tsp paprika
  • 1 cup sour cream, light or regular
  • 1/4 cup chopped fresh parsley or 1 tablespoon dried

Cooked egg noodles or rice, for serving
In a 12-inch nonstick skillet, heat 1-2 teaspoons olive oil and saute diced bacon over medium heat until crispy. Transfer bacon to a paper-towel lined plate and set aside, leaving any grease/oil in the pan. Add sliced mushrooms to the skillet and cook, stirring occasionally, for about one minute (if the pan is too dry, add a teaspoon of oil as needed). Add salt. Continue cooking until the mushrooms are softened and have given up most of their juices. Transfer them to the same plate as the bacon.
In the same skillet, brown the ground beef or turkey with the onion, garlic, salt and pepper. Cook until the meat is no longer pink. Drain the grease.
Stir in the flour and tomato paste to the meat mixture and mix to combine well. Cook over medium heat, stirring often, for 1 minute. Add the beef broth and bring the mixture to a simmer, whisking to combine all the ingredients. Simmer vigorously for 3-5 minutes until the mixture is slightly reduced and thickened. Stir in the Worcestershire sauce and paprika. Cook until flavors blend, about 5 minutes on medium heat. Add sautéed mushrooms and bacon back to the skillet. Remove the skillet from the heat and stir in the sour cream, mixing well to avoid lumps. Stir in the parsley. Serve over egg noodles.

This recipe has been linked up at:
Tidy Mom
Simply Sweet Home
Mommy's Kitchen
Eat at Home

Monday, February 28, 2011

Skillet Chili Mac with Corn and Green Chilies


Prepare for some one-pot lovin'.  This recipe is simply amazing and scrumptious!  As I am writing this, my mouth is literally watering remembering all the flavors and texture of this dish.  Just like many my meals as of late, this is simple, easy, fast, and healthy!  Make this soon and ENJOY!

Skillet Chili Mac with Corn and Green Chilies
recipe slightly adapted from My Tasty Treasures (who adapted from My Kitchen Cafe, who adapted from Cook's Illustrated)  WHEW, that was a mouthful!
  • 1 TBSP extra-virgin olive oil
  • 1 pound ground turkey or ground beef
  • 1 medium sized onion, minced
  • 1 TBSP chili powder
  • 1 TBSP cumin
  • ½ tsp salt
  • 3 garlic cloves, minced
  • 1 TBSP brown sugar
  • 2 cans (8 ounces each) tomato sauce
  • 2 cups water
  • 8 ounces (2 cups) elbow macaroni, I used Barilla Plus
  • 1 cup frozen corn
  • 1 can (4.5 ounces) chopped green chilies, drained
  • 2 tablespoons fresh cilantro, chopped
  • 2 cups shredded cheese (I used 2 % cheddar jack but you can use pepper jack or a Mexican shredded cheese blend)

Heat oil in a deep skillet medium heat. Add the ground turkey or beef, onion, chili powder, cumin and ½ teaspoon salt. Cook the meat until it is no longer pink. Drain off any excess fat or grease (the amount will depend on how lean your meat is). Stir in garlic and brown sugar and cook until fragrant, about 30 seconds. Stir in tomato sauce, water, and macaroni. Cover and cook, stirring often and keeping the heat at a steady simmer, until the macaroni is tender, about 12–14 minutes.
Stir in 1 cup of the cheese, frozen corn, green chilies and cilantro and sprinkle remaining 1 cup of cheese over the top. Cover and let sit off the heat until the cheese melts, about 2 minutes.

This recipe has been linked up at:
Tidy Mom
Simply Sweet Home
Crazy Domestic
Mommy's Kitchen
Eat at Home